OSPF (Open shortest path first) is one of the most popular routing protocol used in enterprise networks and ISPs, because, it’s very efficient and scalable. It’s also an open standard routing protocol, meaning, any OEM (like Cisco, Juniper, Brocade, etc.) can implement this. Today, we will discuss, how to configure OSPF in Cisco routers.
To do so, first we need to enable OSPF in our router. To enable OSPF, we have to define OSPF process. Then gradually we will assign interfaces and/or address range to an area.
letsconfig(config)#router ospf ?
<1-65535> Process ID
Please note that, this process doesn’t propagate outside of the network. Meaning, you can choose process id any between 1-1-65535 and other end doesn’t need to match.
letsconfig(config)#router ospf 1After the process ID, we need to specify our network(s).
letsconfig(config-router)#network 172.16.0.0 0.0.0.255 area 0Here in network statement, we told that our network 172.16.0.0/24 will be advertised in ospf and it will be in area 0 which is backbone area. To learn more about OSPF area, please check OSPF areas explained article.
Specifying IP subnet is not the only way to advertise a network. We also can do that from interfaces. Below is the way to do so.
letsconfig(config)#int gigabitEthernet 0/0
letsconfig(config-if)#ip add 172.16.0.1 255.255.255.0
letsconfig(config-if)#ip ospf 1 area 0
letsconfig(config-if)#end
So, below are the final outcome of our basic OSPF configuration on Cisco IOS/IOS-XE routers.
letsconfig#conf t
letsconfig(config)#router ospf 1
letsconfig(config-router)#network 172.16.0.0 0.0.0.255 area 0
letsconfig(config-router)#end
If you want to add authentication for your OSPF peer. Please have a look OSPF Authentication article.
- How to configure OSPF in Cisco Router (this article)
- How to Configure OSPF Authentication
Now, lets configure ospf on below network topology.
Network Topology
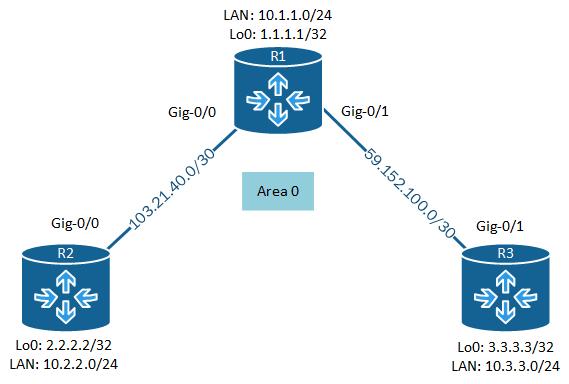
OSPF Configuration
First of all, start with IP address configuration on each router:
Router R1
R1(config)#int gig0/0
R1(config-if)#ip add 103.21.40.1 255.255.255.252
R1(config-if)#no shutdown

R1(config)#int gig0/1
R1(config-if)#ip add 59.152.100.1 255.255.255.252
R1(config-if)#no shutdown

R1(config)#int GigabitEthernet0/2
R1(config-if)#ip add 10.1.1.1 255.255.255.0
R1(config-if)#no shutdown

R1(config)#int lo0
R1(config-if)#ip add 1.1.1.1 255.255.255.255
Similarly, let’s configure IP addresses on other two routers.
Router R2
R2(config)#int gig0/0
R2(config-if)#ip add 103.21.40.2 255.255.255.252
R2(config-if)#no shutdown

R2(config)#int gig0/2
R2(config-if)#ip add 10.2.2.1 255.255.255.0
R2(config-if)#no shutdown

R2(config)#int lo0
R2(config-if)#ip add 2.2.2.2 255.255.255.255
Router R3
R3(config)#int gig0/1
R3(config-if)#ip add 59.152.100.2 255.255.255.252
R3(config-if)#no shutdown

R3(config)#int gig0/2
R3(config-if)#ip add 10.3.3.1 255.255.255.0
R3(config-if)#no shutdown

R3(config)# int lo0
R3(config-if)#ip add 3.3.3.3 255.255.255.255
Now, let’s configure OSPF.
OSPF on R1
R1(config)#router ospf 1
R1(config-router)#router-id 1.1.1.1
R1(config-router)#network 103.21.40.0 0.0.0.3 area 0
R1(config-router)#network 59.152.100.0 0.0.0.3 area 0
R1(config-router)#network 10.1.1.0 0.0.0.255 area 0
R1(config-router)#exit
R1(config)#
Likewise, let’s configure OSPF on last two routers.
OSPF on R2
R2(config)#router ospf 2
R2(config-router)#router-id 2.2.2.2
R2(config-router)#network 10.2.2.0 0.0.0.255 area 0
R2(config-router)#network 103.21.40.0 0.0.0.3 area 0
R2(config-router)#exit
R1(config)#
OSPF on R3
R3(config)#router ospf 3
R3(config-router)#router-id 3.3.3.3
R3(config-router)#network 10.3.3.0 0.0.0.255 area 0
R3(config-router)#network 59.152.100.0 0.0.0.3 area 0
R2(config-router)#exit
R1(config)#
Verification of OSPF
If we configure correctly, we will see log messages just like below –
Terminal log on R1
*Jul 30 19:12:25.214: %OSPF-5-ADJCHG: Process 1, Nbr 3.3.3.3 on GigabitEthernet0/1 from LOADING to FULL, Loading Done
*Jul 30 19:19:01.444: %OSPF-5-ADJCHG: Process 1, Nbr 2.2.2.2 on GigabitEthernet0/0 from LOADING to FULL, Loading Done
log on R2
*Jul 30 19:19:01.871: %OSPF-5-ADJCHG: Process 1, Nbr 1.1.1.1 on GigabitEthernet0/0 from LOADING to FULL, Loading DoneTerminal log on R3
*Jul 30 19:12:30.940: %OSPF-5-ADJCHG: Process 3, Nbr 1.1.1.1 on GigabitEthernet0/1 from LOADING to FULL, Loading DoneFinally, we will verify OSPF on each router.
Router – R1
R1#show ip ospf neighbor

Neighbor ID     Pri   State           Dead Time   Address         Interface
3.3.3.3           1   FULL/DR         00:00:32    59.152.100.2    GigabitEthernet0/1
2.2.2.2           1   FULL/BDR        00:00:34    103.21.40.2     GigabitEthernet0/0
R1#
Seems like, we are doing great. Now verify other two.
Router – R2
R2#show ip ospf neighbor

Neighbor ID     Pri   State           Dead Time   Address         Interface
1.1.1.1           1   FULL/DR         00:00:33    103.21.40.1     GigabitEthernet0/0
R2#
Router – R3
R3#show ip ospf neighbor

Neighbor ID     Pri   State           Dead Time   Address         Interface
1.1.1.1           1   FULL/BDR        00:00:39    59.152.100.1    GigabitEthernet0/1
R3#
It’s sure enough, we successfully configured OSPF on all 3 routes. Each and every routers are now showing it’s neighbor. Now let’s check routing table and test ping from R2 to R3.
R2#show ip route
Codes: L - local, C - connected, S - static, R - RIP, M - mobile, B - BGP
       D - EIGRP, EX - EIGRP external, O - OSPF, IA - OSPF inter area
       N1 - OSPF NSSA external type 1, N2 - OSPF NSSA external type 2
       E1 - OSPF external type 1, E2 - OSPF external type 2
       i - IS-IS, su - IS-IS summary, L1 - IS-IS level-1, L2 - IS-IS level-2
       ia - IS-IS inter area, * - candidate default, U - per-user static route
       o - ODR, P - periodic downloaded static route, H - NHRP, l - LISP
       a - application route
       + - replicated route, % - next hop override, p - overrides from PfR

Gateway of last resort is not set

      2.0.0.0/32 is subnetted, 1 subnets
C        2.2.2.2 is directly connected, Loopback0
      10.0.0.0/8 is variably subnetted, 4 subnets, 2 masks
O        10.1.1.0/24 [110/2] via 103.21.40.1, 00:11:42, GigabitEthernet0/0
C        10.2.2.0/24 is directly connected, GigabitEthernet0/2
L        10.2.2.1/32 is directly connected, GigabitEthernet0/2
O        10.3.3.0/24 [110/3] via 103.21.40.1, 00:11:42, GigabitEthernet0/0
      59.0.0.0/30 is subnetted, 1 subnets
O        59.152.100.0 [110/2] via 103.21.40.1, 00:11:42, GigabitEthernet0/0
      103.0.0.0/8 is variably subnetted, 2 subnets, 2 masks
C        103.21.40.0/30 is directly connected, GigabitEthernet0/0
L        103.21.40.2/32 is directly connected, GigabitEthernet0/0
R2#
OK, now let’s ping LAN interface of R3 from R2 router.
R2#ping 10.3.3.1
Type escape sequence to abort.
Sending 5, 100-byte ICMP Echos to 10.3.3.1, timeout is 2 seconds:
!!!!!
Success rate is 100 percent (5/5), round-trip min/avg/max = 2/16/67 ms
R2#
Seems like it’s working. Now, ping from R2 to LAN PC under R3.
R2#ping 10.3.3.37
Type escape sequence to abort.
Sending 5, 100-byte ICMP Echos to 10.3.3.37, timeout is 2 seconds:
!!!!!
Success rate is 100 percent (5/5), round-trip min/avg/max = 3/5/12 ms
R2#
If you want to know about OSPF designing, chcek OSPF design guide from Cisco.
I hope this helps! Let me know, if you have any questions. I am happy to answer any questions related to How to configure OSPF in Cisco Router.
Jul 30 19:12:25.214: %OSPF-5-ADJCHG: Process 1, Nbr 3.3.3.3 on GigabitEthernet0/1 from LOADING to FULL, Loading Done
*Jul 30 19:19:01.444: %OSPF-5-ADJCHG: Process 1, Nbr 2.2.2.2 on GigabitEthernet0/0 from LOADING to FULL, Loading Done
Hi Abhijeet,
Can you check MTU size in both end? Also capture “debug ip ospf adj” (if it possible) to get a better insight on adjacency drop and recovery.
sir, we will get log message again and again
Hi Abhijeet, can you clarify what log messages are you talking about?