In this lesson, we will learn how to Configure Juniper SRX as a beginner. We will configure it as our network gateway. We will perform the following activities and it will be updated day by day.
- Configuring root password
- Creating a new username
- Giving a hostname
- Set DNS server on Juniper SRX
- Enabling SSH on SRX
- Setting up ntp and time zone
- IP addressing
- Configure two zone. One will be internet facing and another will be LAN facing.
- Security policy configuration for Zone
- Configure static as a routing protocol
- OSPF Configuration
- BGP Configuration
- Configure NAT
- High Availability
- VPN
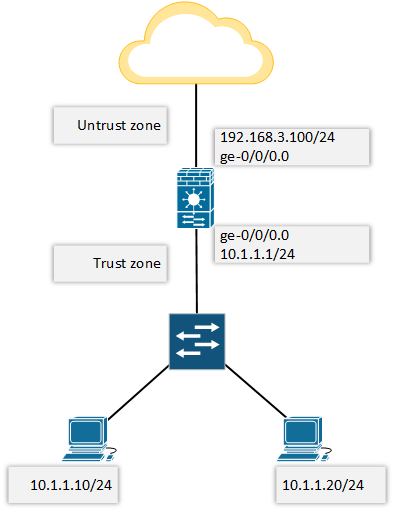
So, let’s begin with below network topology.
If we login to the new SRX box, there will be no password for root. Just press ENTER.
login: root
Password:

--- JUNOS 12.1X47-D20.7 built 2015-03-03 21:53:50 UTC
root@%
We need to use “cli” to enter Operational mode.
root@% cli
root>
Enter configuration mode by using configure command.
root> configure
Entering configuration mode

[edit]
root#
Now, let’s move to the main configuration part, where we will configure Juniper SRX as a network gateway.
Configuring root password:
root# set system root-authentication plain-text-password
New password:
Retype new password:

[edit]
root#
Creating a new user name:
[edit]
root# set system login user rajib class super-user authentication plain-text-password
New password:
Retype new password:
Giving a hostname.
[edit]
root# set system host-name letsconfig-SRX

[edit]
root# commit
commit complete

[edit]
root@letsconfig-SRX#
Set DNS server on Juniper SRX:
[edit]
root@letsconfig-SRX# set system name-server 8.8.8.8
Enabling SSH on SRX:
[edit]
root@letsconfig-SRX# set system services ssh
Setting up ntp and time zone:
[edit]
root@letsconfig-SRX#set system time-zone Asia/Dhaka
[edit]
root@letsconfig-SRX# set system ntp server time.google.com
I am from Bangladesh, that’s why my time zone is Asia/Dhaka. Set your own time-zone here. Important: While using the domain name as ntp server, please make sure you have reachbility to that domain and also you have DNS enable.
We can use following commands to verify our ntp.
[edit]
root@letsconfig-SRX# run show ntp status
status=c035 sync_alarm, sync_unspec, 3 events, event_clock_reset,
version="ntpd 4.2.0-a Tue Mar 3 22:07:26 UTC 2015 (1)",
processor="i386", system="JUNOS12.1X47-D20.7", leap=11, stratum=16,
precision=-19, rootdelay=0.000, rootdispersion=0.180, peer=0,
refid=STEP, reftime=00000000.00000000 Thu, Feb 7 2036 12:28:16.000,
poll=4, clock=df0f2f46.7604dcc4 Sat, Aug 4 2018 1:45:10.461, state=3,
offset=0.000, frequency=0.000, jitter=0.002, stability=0.000


[edit]
root@letsconfig-SRX# run show system uptime | match current
Current time: 2018-08-04 01:45:53 BDT
IP addressing:
Here note that, family mode inet means it’s IPv4, inet6 means IPv6.
set interfaces ge-0/0/0 unit 0 family inet address 192.168.3.100/24
set interfaces ge-0/0/1 unit 0 family inet address 10.1.1.1/24
Zone configuration:
set security zones security-zone untrust interfaces ge-0/0/0.0
set security zones security-zone untrust host-inbound-traffic system-services all
set security zones security-zone untrust host-inbound-traffic protocols all

set security zones security-zone trust interfaces ge-0/0/1.0
set security zones security-zone trust host-inbound-traffic system-services all
set security zones security-zone trust host-inbound-traffic protocols all
I allowed everything on our network. You can restrict services and protocols here. Use a question mark (?) after “system-services” and “protocols”, check which one is needed for your network and allow them accordingly.
Security policy configuration for Zone:
edit security policies from-zone trust to-zone untrust policy our-internet-policy
            set match source-address any
            set match destination-address any
            set match application any
            set then permit
            exit

edit security policies from-zone untrust to-zone trust policy our-deny-policy
            set match source-address any
            set match destination-address any
            set match application any
            set then deny
            exit
commit
In this section, i allowed everything in outgoing path and deny everything in incoming path.
Configure static as a routing protocol:
set routing-options static route 0.0.0.0/0 next-hop 192.168.3.1
This is the way to configure static in JunOS.
OSPF Configuration:
I have started a series on OSPF configuration on Juniper.
BGP Configuration:
You will find a BGP series on this blog. This list of articles which will be updated day by day. So, keep in touch.
Configure NAT/PAT:
Here is a basic PAT configuration of PAT on Juniper SRX.
set security nat source rule-set our-nat-rule-set from zone trust
set security nat source rule-set our-nat-rule-set to zone untrust
set security nat source rule-set our-nat-rule-set rule our-nat-rule match source-address 10.1.1.0/24
set security nat source rule-set our-nat-rule-set rule our-nat-rule match destination-address 0.0.0.0/0
set security nat source rule-set our-nat-rule-set rule our-nat-rule then source-nat interface
High Availability:
I will publish multiple tutorials on High Availability. Hope, following articles will help you all.
VPN:
Finally, here is list of articles on VPN.
Note: If you want to know more about Juniper SRX product line, please have a look https://www.juniper.net/us/en/products-services/security/srx-series/.
This article will be updated day by day. So, if you want me to write on any particular topic. Please feel free to contact me. 🙂
Hi, I need some assistance with migrating from SSG5 to SRX300. I only use the SSG5 for an IPSec VPN back to my PA. Is there an easy way to convert my SSG5 config to work with the SRX300? Very basic and simple config.
Thanks!
Hi,
Please how can I configure two different ports as different zones and allow internet traffic for each zones
Zone is only for segregating services. So, number of zones doesn’t mean anything special. Just follow the basics, it will work.
Hi,
If I have a third station, how can i configure it?
please guide next add a third station configures
thank you
Did you mean 3rd security zone?
Hi. I am new to Juniper and need some help and guidance.
I have to do a basic setup with a SRX300. I am getting a fiber line from ISP which is connected to a ZyXel GPON converter that givesme the chance to use RJ45.
Basically, what I want is, ge0/0/0 to be for the ISP, ge0/0/1 and ge0/0/2 to be used for my NAS server, ge0/0/3 for client PC and ge0/0/4+ge0/0/5 for access points.
Of course if it’s possible, I get rid of the ZyXel convertor and use SFP module on ge0/0/7.
Also, my ISP provider says that I need to set ViD 101 on the WAN in order to access the www.
Can anyone advise on this? Every help would appreciated!
Thanks in advance!
If you still need help, contact me though “hire me” page.
My ISP requires ViD 101. Have anyone tried this and got it working
Thanks Rajib, most helpful, even it easier to convert Cisco configuration to juniper.
Hi Abhishek, thanks for your comment.
Thank you so much. It is so helpful.
Hi EMMA, thanks for your comment.
Good, interested more in firewall settings
I will add more. Thanks for your comment.
Hi, Rajib
my cisco configuration is
ip route 0.0.0.0 0.0.0.0 172.24.138.118
ip nat pool 1 117.242.156.49 117.242.156.54 netmask 255.255.255.248
ip nat inside source list 1 pool 1 overload
ip access-list standard 1
permit any
what is the configuration on juniper srx320?
Please solve this.
Static route and NAT configuration is already shared here.
Hi rajib,
in my scenario 192.168.0.1/24 is trust zone int ge-1 & 172.24.138.117/30 is untrust zone int ge- 3 and gateway is 172.24.138.118, and public ip is
117.242.156.49 – 117.242.156.54
how to configure in this scenario?
The configuration depends on your requirements. However, I think, you only need basic configuration which is already mentioned here. If you face any problem during the implementation, you always can reach out to me through comment.
Hi,
Thanks for your reply .below are commands configured for cisco router
snmp-server group MYGROUP v3 priv
snmp-server trap-source GigabitEthernet0
snmp-server host 192.126.111.214 version 3 priv MYUSER
snmp-server host 192.126.124.18 version 3 priv MYUSER
MYPRTG1—- For PRTG Monitoring
Auth – M0nit!
DES
pri- Prtg!@24×7
MYUSER— For SNMP Monitoring
Auth – M0n24!
DES
pri- Nnm!4×7
Can u share me juniper configuration for SNMP configuration on SRX 550 Juniper .Also share how to configure management interface in juniper ??
Hi Naresh, i will try to publish a blog post on SNMP in JunOS soon. Keep in touch.
Hi
Static NAT is configured in Cisco Router .
ip nat inside source static 10.10.10.1 134.101.115.29
I want to configure same into juniper SRX 550 router .Can u share me equivalent Juniper configuration ??
Hi Naresh, below are your desire commands. Hope it will help.
Keep in mind, if you are not doing NAT with interface IP, then you need to configure proxy ARP.
Hi
I am new to juniper .Can u explain meaning of below commands ??
set applications application tcp_8080 protocol tcp
set applications application tcp_8080 destination-port 8080
set applications application udp_3200-3205 protocol udp
set applications application udp_3200-3205 destination-port 3200-3205
set applications application-set SAP_Router_Acess application tcp_3200-3205
set applications application-set SAP_Router_Acess application udp_3200-3205
set applications application-set SAP_Router_Acess application tcp_102
set applications application-set SAP_Router_Acess application tcp_3299
This is the way to create custom application and application-set. In first part of the above commands, it’s forwarding all the traffic to destination port 8080. You need to add policy for this application to complete full configuration.
I need explain configuration for two Vsrx and applying security policy .
Share me your requirements. I will try my best to help you.
Nice
Thanks 🙂
Hello Mr Rajib, I need help to configure dualstack on Juniper SRX, can you share how to configure it ?
Hi Efki, thanks for your comment. Yes, I will.
I will need help to configure vSRX on Ubuntu in the cloud. I need help
Hi Johnson, thanks for your comment.
Let me know, what kind of problem you are facing.