Virtual Device Contexts (VDC) is a CISCO protocol for Nexus 7000 series, which allow a Nexus switch to be logically segmented into virtul switches. It is similar to SRD on IOS-XR platform, and Context on ASA platform. In this lesson, we will learn how to configure VDC in Cisco Nexus switch.
hat is the Prerequisite VDC:
- Require license VDC (default VDC require no license)
- Only 7000 series capable for VDC
What is the limitation of Cisco Nexus VDC:
- VDC configurable only on Nexus 7K (7000, 7700) series
- Supervisor 3E allow 8+1 admin VDC
- Supervisor 2E allow 8+1 admin VDC
- N7K Supervisor 2E allow 8+1 admin VDC
- Supervisor 2 allow 4+1 admin VDC
- Supervisor 1 allow 4 VDC, No admin VDC
- Only administrator can create VDC in default VDC
Configuration of VDC in Nexus 7K:
We will configure VDC from global using VDC command.
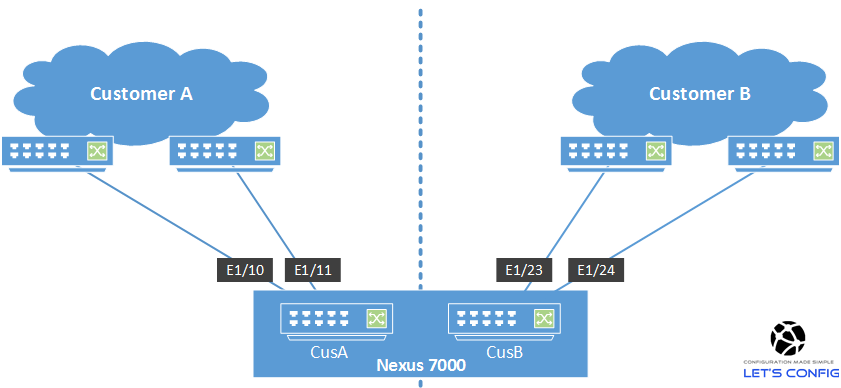
N7K(config)# vdc CusA

Note:  Creating VDC, one moment please ...
We can verify our VDC using “show vdc” command
N7K(config)# show vdc

vdc_id  vdc_name              state               mac                  type        lc
------  --------                -----               ----------              ---------   ------
1       N7K                     active              00:1b:54:c2:66:41   Admin       None
2       CusA                    active              00:1b:54:c2:66:46   Ethernet    m1 f1 m1xl m2xl
Now we will allocate resources into the vdc.
N7K(config)# vdc CusA
N7K(config-vdc)# allocate interface ethernet 1/10
N7K(config-vdc)# allocate interface ethernet 1/11

Moving ports will cause all config associated to them in source vdc to be removed.
Are you sure you want to move the  ports (y/n)?  [yes] y
We also can limit resourse usages for our CusA vdc.
N7K(config)# vdc CusA
N7K(config-vdc)# limit-resource port-channel minimum 32 maximum equal-to-min
N7K(config-vdc)# limit-resource u4route-mem minimum 32 maximum equal-to-min
7K(config-vdc)# limit-resource u6route-mem minimum 32 maximum equal-to-min
N7K(config-vdc)# limit-resource vlan minimum 32 maximum equal-to-min
N7K(config-vdc)# limit-resource vrf minimum 32 maximum equal-to-min
For further understanding, please check Cisco Nexus 7K configuration guide for VDC.
Hi
Just one question is there and limitation to connecting to vdcs in the same 7k directly ? Ie tou ha e vdc 1 and connext to vdc 2 and run layer 3 eigrp for example between them ?
No limitation in VDC while connecting from one VDC from another. However, in case of technology, there are multiple guidelines and limitations. You will find details here- https://bit.ly/3fxvCbB
Thanks Rajib. I somehow overlooked that. Makes sense now.
One question that’s not clear to me. I understand how you created the vdc. However, when you used the allocate interface command, you didn’t specify which vdc to allocate them to.
Is that because you only have the default vdc and the CusA VDC??? If you had multiple VDCs, how would you specify which VDC to allocate the interfaces to?
Hi Tom, I have specified the VDC. Check, all the commands are under “vdc CusA”.
To allocate any resources, first you need to go to that VDC. In above example, our VDC is “CusA” and we are allocating interface under that VDC only.
N7K(config)# vdc CusA
N7K(config-vdc)# allocate interface ethernet 1/10
If you have any other VDC, for example “CusB”, then go to that VDC and allocate resources.
N7K(config)# vdc CusB
N7K(config-vdc)# allocate interface ethernet 2/5
Hi there! Such a nice write-up, thanks!