In this lesson, we will learn how to configure VRRP on Juniper devices. We will use Juniper SRX box for the lab, however the process for all Junos devices are same. So, let’s start.
We will configure –
- Enable VRRP
- Accept-data
- Preemption
- Authentication
- Track
Configuration:
Before going deeper, let’s check our current configuration.
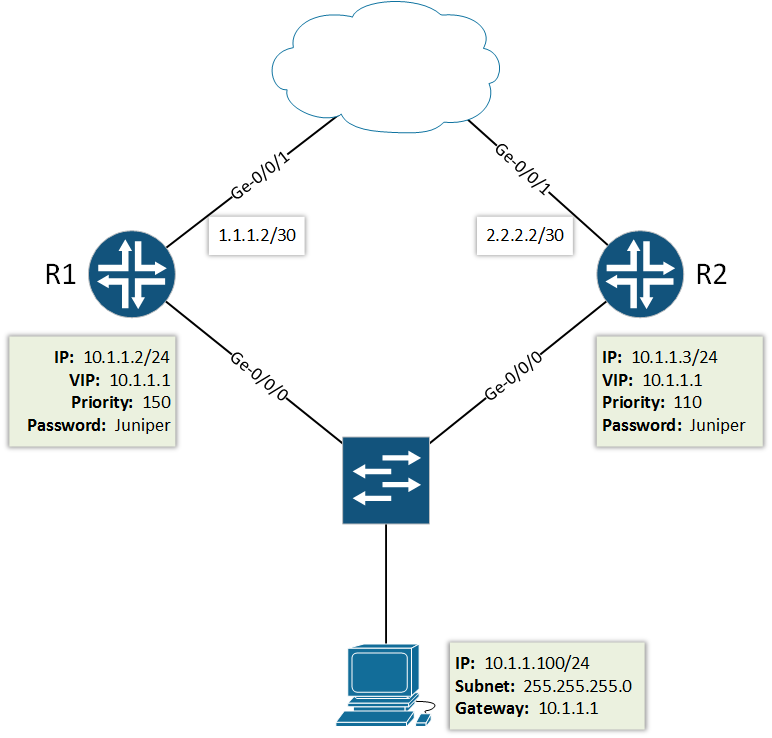
Interface:
[edit]
root@R1# show | display set | match interface
set interfaces ge-0/0/1 unit 0 family inet address 1.1.1.2/30
set interfaces ge-0/0/0 unit 0 family inet address 10.1.1.2/24

[edit]
root@R2# show | display set | match interface
set interfaces ge-0/0/1 unit 0 family inet address 2.2.2.2/30
set interfaces ge-0/0/0 unit 0 family inet address 10.1.1.3/24
Routing:
[edit]
root@R1# show | display set | match routing
set routing-options static route 0.0.0.0/0 next-hop 1.1.1.1

[edit]
root@R1# show | display set | match routing
set routing-options static route 0.0.0.0/0 next-hop 2.2.2.1
We have other configuration also. However, let’s move to the main configuration part–
VRRP configuration for Router R1:
According our plan, we will do VRRP configuration on Ge-0/0/0 interface. At Juniper, the VRRP configuration syntax is after the IP address. So, let’s use power of “edit” command here 🙂
[edit]
root@R1# edit interfaces ge-0/0/0 unit 0 family inet address 10.1.1.2/24
Now, let’s configure VRRP group, which helps to run multiple VRRP. We can use any number between 0-255 as VRRP group.
[edit interfaces ge-0/0/0 unit 0 family inet address 10.1.1.2/24]
root@R1# set vrrp-group 1
At this point, we will configure VRRP parameters.
[edit interfaces ge-0/0/0 unit 0 family inet address 10.1.1.2/24]
root@R1# set vrrp-group 1 virtual-address 10.1.1.1
The virtual address is the gateway for all the LAN users. Now, configure priority to make this router master. We will set priority 150, default is 100.
[edit interfaces ge-0/0/0 unit 0 family inet address 10.1.1.2/24]
root@R1# set vrrp-group 1 priority 150
Accept-data is another important parameter for VRRP. So, what accept-data do?
Without accept-data command, all packets are blocked except ARP. So, if you want to enable ping/ssh/Telnet/etc on virtual address (VIP), then we need to enable accept data in routers.
[edit interfaces ge-0/0/0 unit 0 family inet address 10.1.1.2/24]
root@R1# set vrrp-group 1 accept-data
Also, let’s enable preemption, which helps to keep R1 master whenever it is Up and Running.
[edit interfaces ge-0/0/0 unit 0 family inet address 10.1.1.2/24]
root@R1# set vrrp-group 1 preempt
For the Authentication, we have two options here. One is md5 (HMAC-MD5-96) and another is simple (Simple password).
[edit interfaces ge-0/0/0 unit 0 family inet address 10.1.1.2/24]
root@Juniper-01# set vrrp-group 1 authentication-type ?
Possible completions:
  md5                  HMAC-MD5-96
  simple               Simple password
We will configure md5 here, so let’s do that. We will use Juniper as our authentication code.
[edit interfaces ge-0/0/0 unit 0 family inet address 10.1.1.2/24]
root@Juniper-01# set vrrp-group 1 authentication-type md5

[edit interfaces ge-0/0/0 unit 0 family inet address 10.1.1.2/24]
root@Juniper-01# set vrrp-group 1 authentication-key Juniper
For the best practice, we also can track our uplink so that if it goes does, the secondary takes over.
[edit interfaces ge-0/0/0 unit 0 family inet address 10.1.1.2/24]
root@Juniper-01# set vrrp-group 1 track interface ge-0/0/0.0 priority-cost 50
So, final configuration for R1 is –
interfaces {
    ge-0/0/0 {
        unit 0 {
            family inet {
                address 10.1.1.2/24 {
                    vrrp-group 1 {
                        virtual-address 10.1.1.1;
                        priority 150;
                        preempt;
                        accept-data;
                        authentication-type md5;
                        authentication-key {**************SECRET-DATA}
                        track {
                            interface ge-0/0/0.0 {
                                priority-cost 50;
                            }
                        }
                    }
                }
            }
        }
    }
}
VRRP configuration for Router R2:
interfaces {
    ge-0/0/0 {
        unit 0 {
            family inet {
                address 10.1.1.3/24 {
                    vrrp-group 1 {
                        virtual-address 10.1.1.1;
                        priority 110;
                        preempt;
                        accept-data;
                        authentication-type md5;
                        authentication-key {**************SECRET-DATA}
                    }
                }
            }
        }
    }
}
If you want, you can read more about VRRP from Juniper TechNotes.
Hi there,
Just a question – if you have additional sw between ge-0/0/0 and client sw how you will do the tracking as ge-0/0/0 will remain UP all the time?
In FHRP, you do not need to track internal link. If switches can’t exchange heartbeat messages, automatically role will be shifted. You need to track uplink only.
Very well explained.
Question though: is the diagram correct? It shows ge-0/0/1 as the internet facing interfaces, but the configuration statements show ge-0/0/0 as the internet facing interfaces.
Thanks!
Hi Matthew, you are right. I have changed the configuration as per diagram.
address 192.168.10.2/24 {
vrrp-group 10 {
virtual-address 192.168.10.1;
priority 150;
preempt;
accept-data;
authentication-type md5;
authentication-key “$9$42aJDzF/AtOHq0BREyrs2g”; ## SECRET-DATA
track {
interface ae0.10 {
priority-cost 50;apllience i use
I tested the ping from PC VPC to 192.168.10.1, still not working
apllience i use :
Model: vsrx
Junos: 15.1X49-D80.4
JUNOS Software Release [15.1X49-D80.4]
Make sure your emulator is working properly. And, then re-try. It will work.
Hello,
I have configured this topology, but when doing ping 1.1.1.1 from VPC on GNS3 getting this:
PC1> ping 10.1.1.1
host (10.1.1.1) not reachable
Make sure “accept-data” command is there.