Breakout is a mechanism to divide a high bandwidth interface into smaller bandwidth interfaces. Cisco Nexus switches support the breakout of high bandwidth interfaces at the module level or at the per-port level. In this lesson we will learn how to Configuring Interfaces Breakout in Nexus.
So, we can split interfaces in two methods. These are-
- Module Level Breakout
- Dynamic Breakout
Module Level Breakout:
When we want to breakout a full module, then this is the way to do that. Below command will need to be executed.
interface breakout module < module_number >

Example:
Nexus(config)# interface breakout module 1
Module will be reloaded. Are you sure you want to continue(yes/no)? yes
If you want to revert back, then use no interface breakout module command.
You have to keep in mind, a modular level breakout needs the module reload and all configurations of that particular module will be deleted.
Dynamic Breakout:
This is the method for peer interface breakout. Below command will help to breakout the interface at port level.
interface breakout module {module_no.} port {port_no.} map {new_port_map}

Example:
Nexus(config)# interface breakout module 2 port 1 map 10g-4xBreakout LAB:
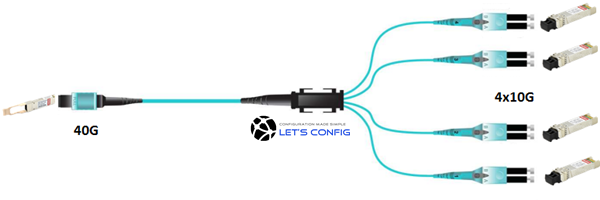
In this LAB we will breakout a 40G interface into 4x10G interface. We are using N9K-C93180LC-EX as our physical hardware.
N9K-C93180LC-EX# show module
Mod Ports             Module-Type                       Model          Status
--- ----- ------------------------------------- --------------------- ---------
1    32   28x40G + 4x40/100G Ethernet Module    N9K-C93180LC-EX       active *
We are using default portmode for this particular model.
N9K-C93180LC-EX# show running-config | i portmode
hardware profile portmode 4x100G+28x40G
Before breakout, here is the “show interface brief” output.
N9K-C93180LC-EX# show interface brief | i Eth1/
Eth1/1        --      eth  routed down    XCVR not inserted          auto(D) --
Eth1/2        --      eth  routed down    XCVR not inserted          auto(D) --
Eth1/3        --      eth  routed down    XCVR not inserted          auto(D) --
Eth1/4        --      eth  routed down    XCVR not inserted          auto(D) --

--- output omitted ---
Before configuring any breakout, it’s recommended to check the release note and configuration guide to know details about limitation or best practices. In this particular model below are the limitations-
For default portmode, if we do 4x10G breakout, then it is supported only on 1,3,5,…,27 port number. And if we breakout, then the corresponding bottom port will be non-operational. For example, if we configure port 1, then port 2 will be non-operational. If we configure port 3, then port 4 will be non-operational.
There is also limitation, if you use other portmodes. So, it is highly recommended to check Cisco nexus configuration guide as reference.
Now, let’s move to the main configuration part.
N9K-C93180LC-EX(config)# interface breakout module 1 port 1,3 map ?
  10g-4x  Breaks out a 40G  high BW front panel port into four 10G ports
  25g-4x  Breaks out a 100G  high BW front panel port into four 25G ports
  50g-2x  Breaks out a 100G high BW front panel port into two 50G ports

N9K-C93180LC-EX(config)# interface breakout module 1 port 1,3 map 10g-4x
So, we are done with the breakout. Let’s verify our new interfaces.
N9K-C93180LC-EX# show interface brief | i Eth1/
Eth1/1/1      859     eth  access up      none                        10G(D) --
Eth1/1/2      859     eth  access up      none                        10G(D) --
Eth1/1/3      859     eth  access up      none                        10G(D) --
Eth1/1/4      859     eth  access up      none                        10G(D) --
Eth1/3/1      859     eth  access up      none                        10G(D) --
Eth1/3/2      859     eth  access up      none                        10G(D) --
Eth1/3/3      859     eth  access up      none                        10G(D) --
Eth1/3/4      859     eth  access up      none                        10G(D) --
Eth1/5        --      eth  routed down    XCVR not inserted          auto(D) --
Eth1/6        --      eth  routed down    XCVR not inserted          auto(D) --
Eth1/7        --      eth  routed down    XCVR not inserted          auto(D) --

--- output omitted ---
Clearly, we can see that, our Eth1/1 interface is now becoming Eth1/1/1-4, and Eth1/3 port into Eth1/3/1-4. So, this is how we do the breakout in nexus.
Hi Rajib, help me please.
93180LC-EX – can I configure ports individually, for example:
1,3,5 – 40/50-Gigabit ports (as in portmode #1)
7,9 – 40G/100G ports (as in portmode #3)
11,13…. – again 40/50-Gigabit
or it is impossible ? Thanks in advance.
Hi WOLV, did you check the Cisco documentation?
Yes.
It says I can, but no information how.
cisco nexus 3016 model support breakout
Did you check the Cisco documentation?
Hi Rajib, thanks for this useful information.
Pls help me with below query.
I’m working on N9K-C9364C-GX Switch, I need to breakdown port 63 and port 64 (100G – 4*10G)
I’m running this command directly – interface breakout module 1 port 63 map 10g-4x and I’m getting below warning –
Warning: Interfaces: eth1/62, eth1/64 are purged and I’m unable to see these ports further.
Is it also a limitation?
Hi DANISH, did you checked Cisco official documentation on this?
HI Rajib,
I am not able to configure Beakout on Nexus C9372TX. Does it support breakout and if yes, can you tell me the best way?
Hey Dilip, you are advised to check Cisco product datasheet first.
Hi Rajib, Can I configure vPC on interfaces breakout?
Yes, you can.
Thanks for the post.
Should interfaces after breakout i.e. Eth1/1/1-4 and Eth1/3/1-4 in this example be called as sub interfaces?
Hi Nishant, sub-interfaces is different thing. You can call this breakout interface.
I have n3k-c3172tq-32t , does it support module level breakout.
Nexus 3172 model support breakout. For particule part number, you need to check Cisco official document.
Hello Rajib,
I am not able to configure Beakout on N5K-C5648Q. Does it support breakout and if yes, can you tell me the best way?
Thanks for your support!
Have you reviewed the datasheet for this?
Hi Rajib
I have 2 cisco Nexus9000 93180YC-EX and 2 cisco Nexus3548 switches… I want to connect the N9K to N3K using the breakoutcable…. if I insert the QSFP to each N9K switch and connect the 10G interfaces to each N3K switch, is that the way to go?
Also do i run this command on my N3K switches?
interface breakout module 2 port 1 map 10g-4x
Thank You
Yes, your physical connection is correct. And, you do not need to run breakout command on N3K.
If i am not mistaken, 93XX series doesn’t support breakout. However, you can check cisco official document on breakout.
hi Rajib Kumer,
I have C9372PX I cant find hardware profile or interface breakout command. How can enable the module?
I have another 3172T thats working correctly.
I’m using 7.0(3)
I’m not seeing the breakout command on my Nexus 9324OYC-FX2. Is it supported?
Hi John, 93240YC-FX2 doesn’t support interface breakout. However, i will recommend you to get a confirmation by TAC.
thnx man
You’re very welcome..
hi Rajib Kumer,
i am having trouble with my cisco nexus 3064qp switch that i can’t find the interface breakout module 1 in my switch commend line, would you please tell me how to enable this feature in my nexus switch in order to breakout switch ports.
Hi Abdul,
For 3064 series switches, you need to run below command.
hardware profile portmode 48x10g+4x40g
or,
hardware profile portmode 64x10g
Your switch need to be reloaded for the change to take effect. Let me know if it works for you.
Configuring breakout on QSFP ports using speed 10000 adds interface breakout module module number port port range map – in the running-config output.
Yes, “interface breakout module {module number} port {port range} map {map}” is the command for breakout. But, I didn’t get your point. Please elaborate.
It is very helpful to understand, Thanks for the post and keep continue.