Encapsulated Remote Switched Port Analyzer (ERSPAN) is a technique to mirror traffic over L3 network. Traffic will be encapsulated at the source end and then decapsulated at the destination end. In this lesson, we will learn to configure ERSPAN in Nexus switches.
Network Topology
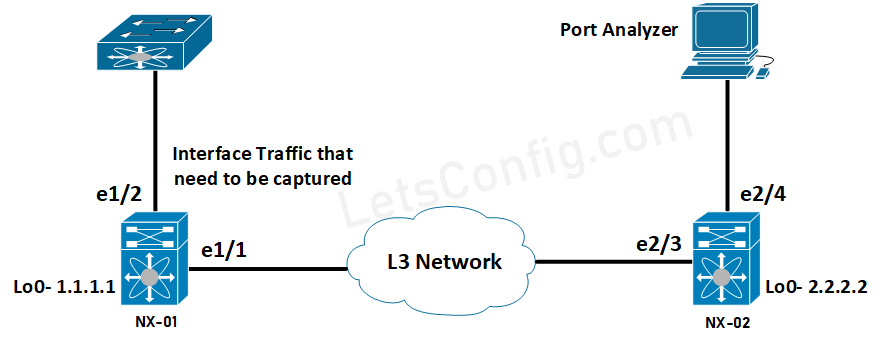
I will present very sample configuration based on below topology. Hope it will be helpful.
Let’s set a Goal
- Need to capture traffic from interface e1/2 on NX-01 switch.
- But that capture need to happen from e2/4 interface on switch NX-02.
Configuration of ERSPAN
Let’s configure source switch (NX-01), based on Cisco recommendation.
NX-01(config)# monitor session 10 type erspan-source
NX-01(config-erspan-src)# erspan-id 20
NX-01(config-erspan-src)# vrf default
NX-01(config-erspan-src)# destination ip 2.2.2.2
NX-01(config-erspan-src)# source interface ethernet e1/2 both
NX-01(config-erspan-src)# no shut
NX-01(config-erspan-src)# exit

NX-01(config)# monitor erspan origin ip-address 1.1.1.1 global++ By default “monitor session” is disabled, you need to run “no shutdown” to enable it.
Now, we will configure destination switch (NX-02).
NX-02(config)# monitor session 10 type erspan-destination
NX-02(config-erspan-dst)# erspan-id 20
NX-02(config-erspan-dst)# source ip 2.2.2.2
NX-02(config-erspan-dst)# destination interface e2/4
NX-02(config-erspan-dst)# no shut
NX-02(config-erspan-dst)# exit
Our configuration is done. Now, we need to connect an analyzer at e2/3 port on the destination switch (NX-02) and we will get the capture data.
This is how to configure ERSPAN in Nexus switches. Let me know if you have any questions.
Reference
Cisco Nexus 7000 Series NX-OS System Management Configuration Guide.
Author, please add to the article information about destination port configuration:
interface Ethernet2/4
description — ERSPAN —
switchport
switchport monitor
no shutdown
And notice that fact: Source ip is that local ip address on the switch where ERSPAN forward to from the ERSPAN source switch.
And please add troubleshooting command.
After these addictions your artical will be complete useful for everyone.
Thanks, for your job
I love above Switching topics, I am eager to learn more on Security and Data Center environments.