Policy Based Routing or PBR is a feature to manipulate routing and forwarding based on policies, set by the network administrator. In this lesson, we will learn to configure PBR in Cisco Nexus switches.
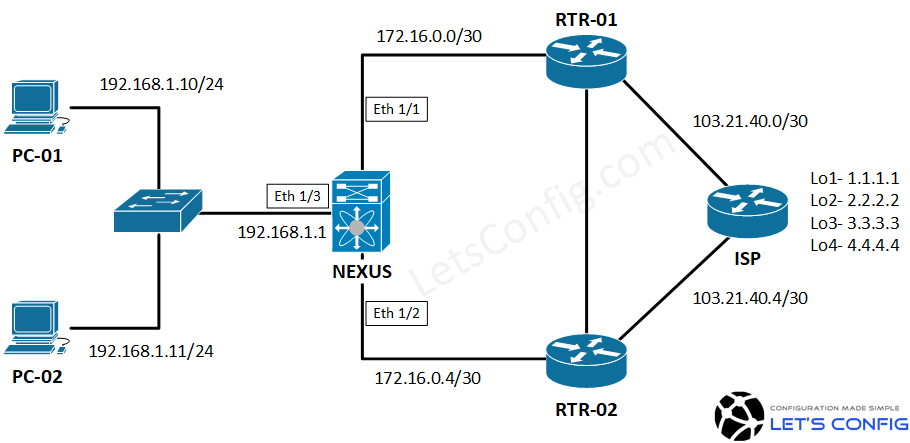
Lab Diagram:
Goal of the Lab:
- Create PBR for source PC-02 (192.168.1.11)
- Deny PBR for PC-02 when destination is 1.1.1.1
Existing Configuration Verification:
Before configuring the PBR, let’s verify existing interface and routing configuration on NEXUS switch.
NEXUS# show ip interface brief

IP Interface Status for VRF "default"(1)
Interface            IP Address      Interface Status
Eth1/1               172.16.0.2      protocol-up/link-up/admin-up
Eth1/2               172.16.0.6      protocol-up/link-up/admin-up
Eth1/3               192.168.1.1     protocol-up/link-up/admin-up
Interface Eth1/1 is connected with RTR-01, Eth1/2 is connected with RTR-02, and Eth1/3 connects to LAN network.
I have done some traffic engineering so that all traffic chooses RTR-01 as their primary path for outgoing traffic. Now, let’s check the routing.
NEXUS# show ip route
(output omitted)

1.1.1.1/32, ubest/mbest: 1/0
    *via 172.16.0.1, Eth1/1, [110/3], 00:26:11, ospf-1, intra
2.2.2.2/32, ubest/mbest: 1/0
    *via 172.16.0.1, Eth1/1, [110/3], 00:26:11, ospf-1, intra
3.3.3.3/32, ubest/mbest: 1/0
    *via 172.16.0.1, Eth1/1, [110/3], 00:26:11, ospf-1, intra
4.4.4.4/32, ubest/mbest: 1/0
    *via 172.16.0.1, Eth1/1, [110/3], 00:26:11, ospf-1, intra

(output omitted)
From above output, we can see, for any outgoing traffic, next-hop is 172.16.0.1 which is RTR-01. Now, let’s verify from the source PC.
PC-01> trace 4.4.4.4
trace to 4.4.4.4, 8 hops max, press Ctrl+C to stop
 1   192.168.1.1   4.333 ms  3.862 ms  3.106 ms
 2   172.16.0.1   6.605 ms  6.296 ms  9.341 ms
 3   103.21.40.1   7.118 ms 6.567 ms  7.709 ms

PC-02> trace 4.4.4.4
trace to 4.4.4.4, 8 hops max, press Ctrl+C to stop
 1   192.168.1.1   4.206 ms  5.359 ms  5.103 ms
2   172.16.0.1   17.486 ms  16.268 ms  6.680 ms
 3   103.21.40.1   11.873 ms 6.296 ms  9.341 ms
All the traffic is going through RTR-01 which is expected. We will make sure, PC-02 (192.168.1.11) doesn’t follow PBR when the destination is 1.1.1.1. So, let’s get started.
Configuration:
To configure policy based routing in nexus, we need to follow simple four (4) steps. These are-
- Enabling the feature
- Creating Access List
- Creating Route Map
- Applying Route Map
Enabling the feature
feature pbr
Creating Access List
Important to know, you can’t configure deny rule in Nexus PBR. You need to configure as per below if you need to deny anything in PBR ACL. You can read more about the guideline and limitation from here. In our case, we will deny when the destination is 1.1.1.1.
ip access-list OUR_PBR_DENY_ACL
permit ip host 192.168.1.11 host 1.1.1.1

ip access-list OUR_PBR_PERMIT_ACL
permit ip host 192.168.1.11 any
Creating Route Map
First, we will match deny ACL and then the permit. If condition matched, then next-hop will be 172.16.0.5.
route-map LetsConfig_PBR_MAP deny 10
match ip address OUR_PBR_DENY_ACL
!
route-map LetsConfig_PBR_MAP permit 20
match ip address OUR_PBR_PERMIT_ACL
set ip next-hop 172.16.0.5
Applying Route Map
We need to add this route-map in the interface where the traffic is coming into the Nexus. In our case, it’s Eth1/3 which in LAN interface.
int eth1/3
ip policy route-map LetsConfig_PBR_MAP
Additional Configuration:
If we want to see the PBR statistics, then we need to add below command.
route-map LetsConfig_PBR_MAP pbr-statistics
Verification
NEXUS# show route-map LetsConfig_PBR_MAP pbr-statistics
route-map LetsConfig_PBR_MAP, deny, sequence 10
  Policy routing matches: 11 packets
route-map LetsConfig_PBR_MAP, permit, sequence 20
  Policy routing matches: 9 packets

Default routing: 0 packets
It’s clearly showing, we are getting hits, which means our PBR is working. You also can trace from PC-02 to make sure it’s working.
PC-02> trace 1.1.1.1
trace to 1.1.1.1, 8 hops max, press Ctrl+C to stop
 1   192.168.1.1   4.554 ms  2.957 ms  3.200 ms
 2   172.16.0.1   35.764 ms  6.290 ms  6.447 ms
 3   103.21.40.1   5.785 ms  6.705 ms  6.705 ms

PC-02> trace 2.2.2.2
trace to 2.2.2.2, 8 hops max, press Ctrl+C to stop
 1   192.168.1.1   3.549 ms  9.537 ms  4.240 ms
 2   172.16.0.5   9.304 ms  5.785 ms  6.705 ms
 3   103.21.40.5  6.126 ms  6.603 ms  5.030 ms

PC-02> trace 4.4.4.4
trace to 4.4.4.4, 8 hops max, press Ctrl+C to stop
 1   192.168.1.1   4.237 ms  4.183 ms  2.886 ms
 2   172.16.0.5   6.126 ms  6.603 ms  5.030 ms
 3   103.21.40.5   4.554 ms  2.957 ms  3.200 ms
If you have any question regarding, how to configure PBR in Cisco Nexus switches, do let us know :).
Hey Rajib,
Can you advise if you did this PBR using actual Nexus Hardware or in a Virtual Lab ?
If on a Virtual Lab, can you advise which image you used ?
This was done on hardware.
is posible configure a PBR over an SVI?
HI Alexis, yes, you can do this over SVI.
Please share me the steps for PBR over SVI. I have done few configuration but it’s not working as expected.
Created route-map name is LetsConfig_PBR_MAP
But, in additional config and verification section, route-map names are showing different.
is this correct?
You are right. I corrected the mistakes. Thanks.
HI , I would like to know that how to configure back up next-hop IP address in the same route-map sequence.
My requirement is :-
I have primary & secondary WAN link .Primary must be preferred next-hop of PBR and secondary for backup if primary goes down .
You should go for dynamic routing protocol.
Thank You Very Much
You are most welcome 🙂