In this article i will show you, how to install F5 BIG-IP VE on AWS (Amazon Web Services). So, let’s get started.
Deployment Option:
- Single-NIC BIG-IP VE implementation: In this option, BIG-IP VE and application will be reachable through the same IP with different ports. For example F5 Configuration utility will be reachable using 8443 port and application (web-server) will be reachable through 443.
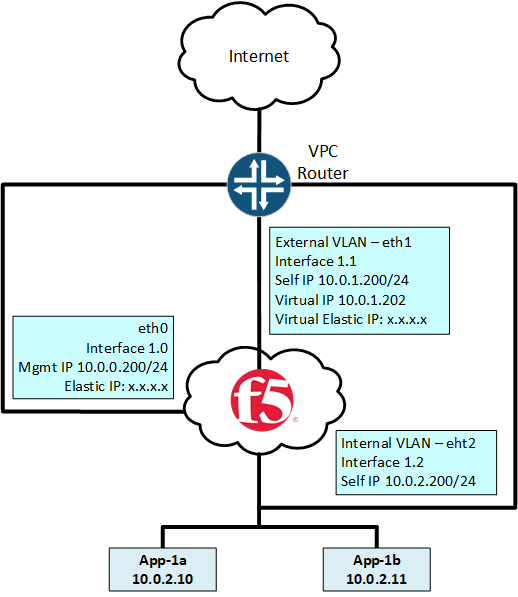
- Two-NICs BIG-IP VE implementation: In the two NICs option, eth0 will be used for management and external interface and eth1 will be used for the internal interface.
- Three-NICs BIG-IP VE implementation: Management, External and Internal interface will be separated just like physical device.
Three-NICs BIG-IP VE Topology:
How to install F5 BIG-IP VE on AWS:
- Create an SSH key pair
- Create a VPC with multiple subnets
- Internal subnet creation
- Add routes so BIG-IP VE can access the Internet
- Create security groups
- Deploy the BIG-IP VE instance
- Create an internal network interface
- Create an Elastic IP for the BIG-IP Configuration utility
- Add a secondary private IP address for the virtual server
- Create an Elastic IP for the virtual server
- Set the admin password for BIG-IP VE
Create an SSH key pair
To create the key, you need to go Services >> Compute >> EC2 >> Network & Security >> Key Pairs and click on Create key pair. Add the Name of the key pair. Select file format pem or ppk. Pem for OpenSSH, and ppk for PuTTy and click Create key pair.
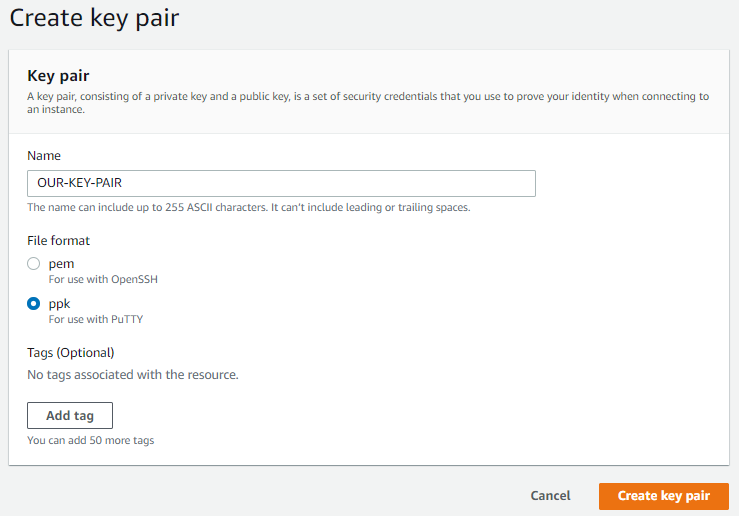
The private key file will be automatically downloaded to your PC. This will be needed later, when you need to SSH to the F5.
Create a VPC with multiple subnets
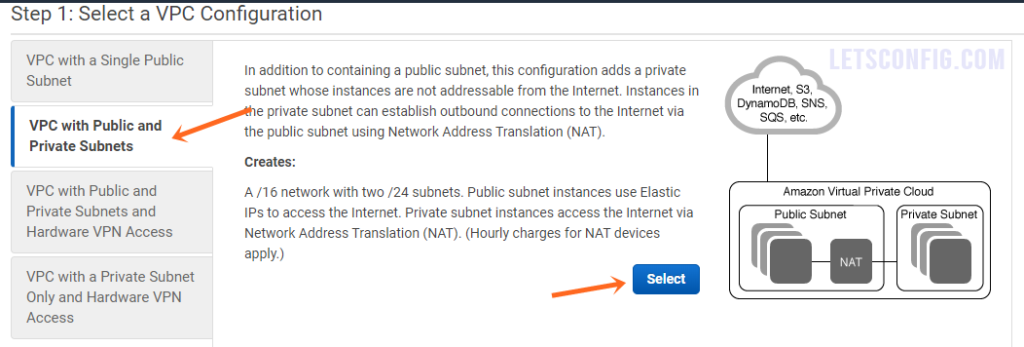
Now, go to Services >> Networking & Content Delivery >> VPC and click Launch VPC Wizard.
In the step 1, from left menu, choose VPC with Public and Private Subnets and click Select.
In the step 2, fill the form like below image-
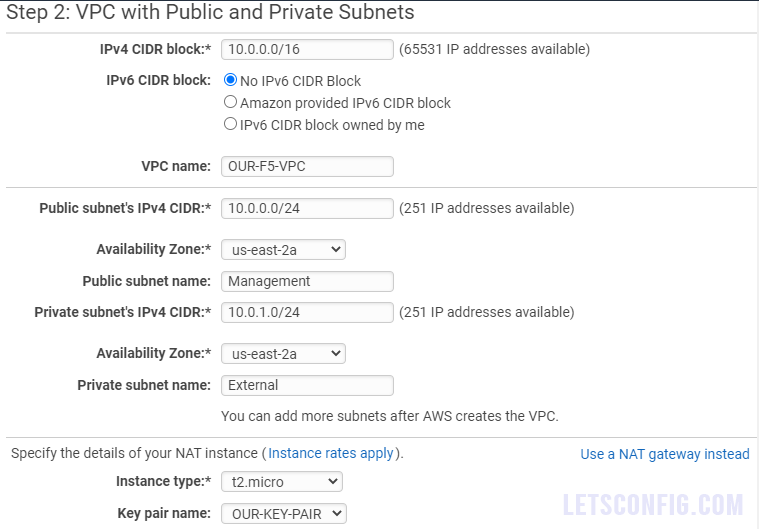
You need to choose install type as per your requirement. You can leave all other as default settings and click Create VPC.
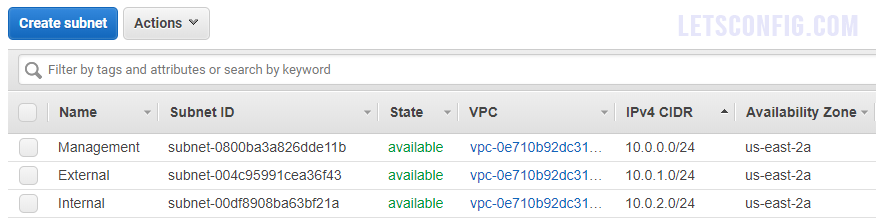
Create an internal subnet
Now, go to Services >> VPC >> Subnet and click Create subnet. You should add below information-
Name tag: Internal
VPC: OUR-F5-VPC
Availability Zone: us-east-2a (i choose this zone for all interfaces)
VPC CIDRs:
IPv4 CIDR block: 10.0.2.0/24
After adding all the information, click Create. Final outcome will be like this-
Add routes so BIG-IP VE can access the Internet
Go to Services >> VPC >> VIRTUAL PRIVATE CLOUD >> Internet Gateways and Create internet gateway.
Add the Name of the internet gateway and click Create internet gateway. In my case it is OUR-INT-GW Now, select your newly created gateway and click Actions. Click on Attach to VPC and select your VPC.
Now, you need to go to route. You will find route from Services >> VPC >> VIRTUAL PRIVATE CLOUD >> Route Tables. Select route table with 1 Subnet.
From the bottom of the page, you need to click on Routes tab, and then go to Edit routes. In the Edit routes section, click Add route and enter 0.0.0.0/0 as the destination, and then select your created Interface gateway (OUR-INT-GW) as your target.
Now, you need to add Internal IP block to the subnet list. To do that, you need to click on Subnet Associations tab, which will be location just right hand side of Routes. Click Edit subnet associations and select the check box for the external subnet, 10.0.1.0/24 and click Save.
Create security groups
Go to Services >> VPC >> SECURITY >> Security Groups and click Create security group. In the Create security group page, name your security group (OUR-Sec-GROUP), choose your VPC (OUR-F5-VPC) and in Inbound rules, allow 22 & 443 for management and then add your desire APP port, in my case it’s web-server, so port will be 80 & 443. You can leave outbound rule as default.
Deploy the BIG-IP VE instance
Go to Services >> Compute >> EC2 and click Launch instance. Now choose AWS Marketplace and search with BIG-IP keyword. It will show you multiple installation options. You need to choose your desire package depending on your requirements.

Then, it will show you overview of your package, click Continue. In my case, i choose t2.medium and click Next: Configure Instance Details.
In Configure Instance page, select as per below-
Number of instances: 1
Network: OUR-F5-VPC
Subnet: Management
From the bottom, expand Network interfaces and click Add Device. For interface eth0, type 10.0.0.200 as Primary IP address and for interface eth1, subnet will be external and 10.0.1.200 as Primary IP address. Now, click Next: Add Storage.
In this step, keep it default and click Next: Tag instance.
In the Add Tag page, clic Add tag. You can add tag as per your choice, it’s optional. Click Next: Configure Security Group.
In the Configure Security Group page, you need to choose Select an existing security group and select both Management rule and Virtual-Server rule, and then click Review and Launch.
Select your key pair, in my case it is OUR-KEY-PAIR, select the acknowledgement check box, and click Launch Instances.
Click View Instances to view the new instance.
Create an internal network interface
Go to Services >> EC2 >> Network & Security >> Network Interface and click Create Network Interface.
Name new interface as Internal, Subnet 10.0.2.0/24, Private IP 10.0.2.200, Security group OUR-Sec-GROUP and then click Create.
Now, you can change name of your interfaces as Management, External, Internal and NAT.

Now, select Internal interface, and from top of the page click Actions and then Attach.
A popup will open, from the Instance ID list, select the VE instance that you created and click Attach.
Important: Now, reboot the LTM VE to register the new NIC. To do that, go to the Instance list and right-click the instance and then choose Instance State -> Reboot.
Create an Elastic IP for the BIG-IP Configuration utility
Go to Services >> EC2 >> Network & Security >> Elastic IPs and click Allocate Elastic IP address.
Click Allocate and then click Close. Now, right-click the newly created EIP and select Associate address from the popup menu screen.
For Resource type select Network interface, for Network interface select the management NIC, and for Private IP select the management subnet’s private IP address, 10.0.0.200.
Click Associate.
Add a secondary private IP address for the virtual server
Go to Services >> EC2 >> Network & Security >> Network Interface and select External interface. Now, right-click on it, and select Manage IP Addresses.
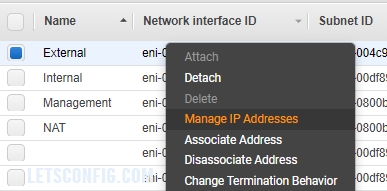
Click on Assign new IP and write 10.0.1.202 and click Yes, Update. Click Cancel to close the dialog box.
Create an Elastic IP for the virtual server
Go to Services >> Compute >> EC2 >> Network & Security >> Elastic IPs and click Allocate Elastic IP address.
In the step, click Allocate, and then click Close.
From the list of EIP addresses, right-click the newly created address, and select Associate address from the popup menu.
Select the external network interface and the secondary IP address (10.0.1.202) and then click Associate.
Set the admin password for BIG-IP VE
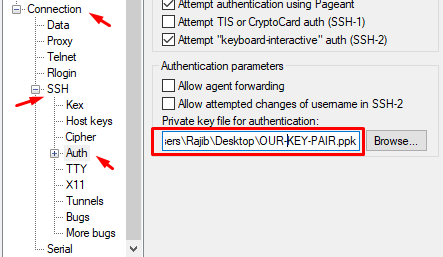
So far, we completed all the configuration on AWS end. Now we will add password for the F5. TO do that, we need to open a PuTTy session to the F5 Big-IP LTM. In my case my IP address is 3.12.238.13 and we will use OUR-KEY-PAIR file as a private key for authentication. We need to go to Connection >> SSH >> Auth in the PuTTy and then use the key pair just like below.
After successful login, run below commands-
tmsh
modify auth password admin
It will ask the password and then ask to confirm the password. Finally, save the configuration by running below command-
save sys config
Now, you will be able to login F5 Big-IP LTM using new password. Let me know, if you face any issue to install F5 BIG-IP VE on AWS.
Hi there. I followed this and thanks for providing it, yet as soon as I connect an AWS enic to the F5 I lose connectivity. Looks like some sort of routing loop or asymmetric routing but not sure how that could be as I don’t get an opportunity to number the interfaces once I connect the enics….
I only have a management default route so can still access the management via SSH.
Hello Dean, how many NIC is there in your deplyment? Share more details about your deplyment and configuraiton.
Also, i recehcekd my configuration and it’s totally fine. So, it should work for you.