Taking the backup is one of the basic but important task for any system including Cisco ISE. In this lesson, we will learn, how to backup Cisco ISE 2.7. So, let’s get started.
Performing Cisco ISE backup, will be done in four (4) steps. These are-
- Creating a Repository
- Adding crypto key
- Backing up ISE
- Backing Up ISE Certificates
Creating a Repository
Cisco ISE allow to create Disk, FTP, SFTP, TFTP, NFS, CDROM, HTTP, HTTPS repository. We will choose SFTP, it’s because SFTP is secure and most of the organization allows SFTP.
To create the repository, we need to go Administration >> System >> Maintenance >> Repository and click Add.
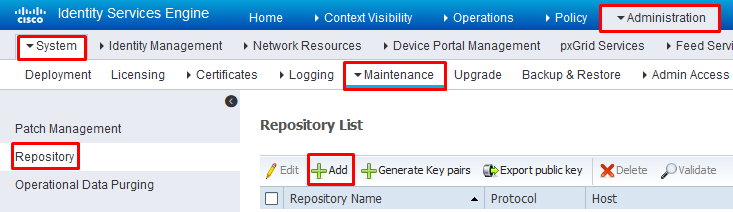
Now, add Repository Name, Protocol, Server Name, Path, USername and Password; and then click Submit. In my case, i added like below-
Repository Name: BackupSFTP
Protocol: SFTP
Server Name: 192.168.2.181 (location of your SFTP server)
Path: / (root directory of sftp server)
Username & Password: rajib (sftp user credentials)
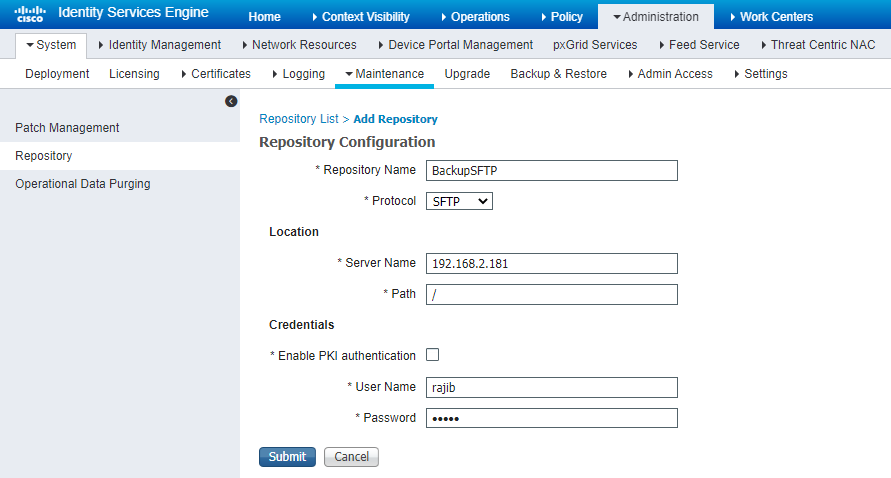
Adding crypto key
After clicking Submit button during repository creation for SFTP, it will show below message-
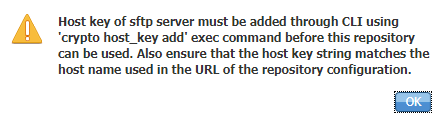
So, we need to create host key, to work with SFTP repository. To create the host key, login to cli and run below command-
crypto host_key add host x.x.x.x
x.x.x.x = IP address of the SFTP server.
CISCO-ISE-01/admin# crypto host_key add host 192.168.2.181
host key fingerprint added
# Host 192.168.2.181 found: line 1 type RSA
1024 5b:eb:ea:b0:c7:58:fe:23:7b:d5:01:8d:7e:c8:d3:33 192.168.2.181 (RSA)
Backing up ISE
To take the backup, we need to go Administration >> System >> Backup & Restore >> and click Backup Now.
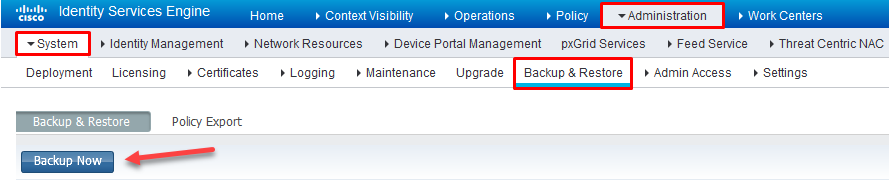
Here, we can take two (2) types of backup, one Configuration backup and other Operational backup.
Configuration backup: It contains configuration data.
Operational backup: It contains monitoring & troubleshooting data.
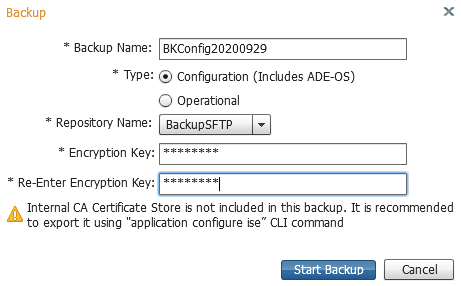
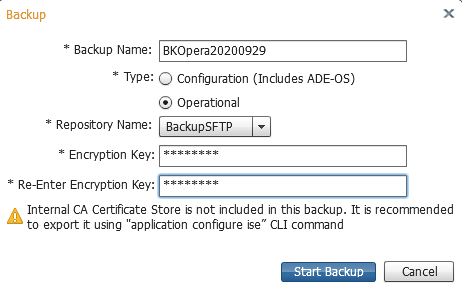
We need to take backup for both. To do that (after clicking Backup Now), we need to add Backup Name, Type, Repository Name, Encryption key and then click Start Backup.
Below are my settings for Configuration backup-
Below are my settings for Operational backup-
If everything OK, you will be able to see the progress just like below-
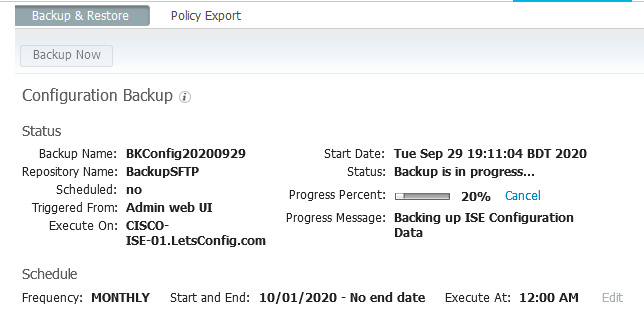
Within next few minutes you will be able to see Cisco ISE backup files in your SFTP root directory. How much time it will take, it depends on the configuration of the ISE.
Backing Up ISE Certificates
To perform ISE certification backup, you need to login CLI and run below command-
application configure ise
Then you need to select option 7 and fill all the data accordingly.
CISCO-ISE-01/admin# application configure ise

Selection ISE configuration option
[1]Reset M&T Session Database
[2]Rebuild M&T Unusable Indexes
[3]Purge M&T Operational Data
[4]Reset M&T Database
[5]Refresh Database Statistics
[6]Display Profiler Statistics
[7]Export Internal CA Store
[8]Import Internal CA Store
[9]Create Missing Config Indexes
[10]Create Missing M&T Indexes
[11]Enable/Disable ACS Migration
[12]Generate Daily KPM Stats
[13]Generate KPM Stats for last 8 Weeks
[14]Enable/Disable Counter Attribute Collection
[15]View Admin Users
[16]Get all Endpoints
[17]Enable/Disable Wifi Setup
[18]Reset Config Wifi Setup
[19]Exit

7
Export Repository Name: BackupSFTP
Enter encryption-key for export: CiscoISE123

log4j:WARN No appenders could be found for logger (org.springframework.core.env.StandardEnvironment).
log4j:WARN Please initialize the log4j system properly.
log4j:WARN See http://logging.apache.org/log4j/1.2/faq.html#noconfig for more info.
Integritycheck Openssl digest output from verification with Swims release key: Verified OK
Integritycheck Output: Verified signature of integritycheck program with Swims release key
Integritycheck Output: Verified signature of integritycheck.sums file with Swims release key
Integritycheck PASSED
Inside Session facade init
In the init method of PDPFacade
Time taken for NSFAdminServiceFactory to load8947
Export in progress...

The following 5 CA key pairs were exported to repository 'BackupSFTP' at 'ise_ca_key_pairs_of_CISCO-ISE-01':
        Subject:CN=Certificate Services Root CA - CISCO-ISE-01
        Issuer:CN=Certificate Services Root CA - CISCO-ISE-01
        Serial#:0x7aa7beb7-adad4fbd-868cd5b7-17f48a18

        Subject:CN=Certificate Services Node CA - CISCO-ISE-01
        Issuer:CN=Certificate Services Root CA - CISCO-ISE-01
        Serial#:0x7df61d4e-dbd14e46-b5751fd0-8168a876

        Subject:CN=Certificate Services Endpoint Sub CA - CISCO-ISE-01
        Issuer:CN=Certificate Services Node CA - CISCO-ISE-01
        Serial#:0x7fde313d-50bf41ee-b80df5de-d21cf653

        Subject:CN=Certificate Services Endpoint RA - CISCO-ISE-01
        Issuer:CN=Certificate Services Endpoint Sub CA - CISCO-ISE-01
        Serial#:0x18c59d99-c8114d79-a3690255-64293510

        Subject:CN=Certificate Services OCSP Responder - CISCO-ISE-01
        Issuer:CN=Certificate Services Node CA - CISCO-ISE-01
        Serial#:0x1c51e21f-1a0043a2-91efc035-24fa1883

ISE CA keys export completed successfully
So, this is how to backup Cisco ISE 2.7. If you have any question, please don’t hesitate to ask.
Reference: Cisco ISE administration guide.
Free SFTP server: https://www.solarwinds.com/free-tools/free-sftp-server
My ise backup fails at 75%. I am using SFTP. Is it a port issue.
I need to know the details about your current ISE version and patch, because there are lots of reasons for this failure, such as a bug, insufficient disk space, or connection issues.
I have to use NFS for my backup choice, how can I get it to work? When I attempt to perform a Backup Now, it just seems to freeze up.
I think https://community.cisco.com/t5/security-knowledge-base/ise-nfs-repository-configuration-example/ta-p/3740434 will help you.
Hi rajib,
Can i backup from ISe version 2.3 and restore it to Ise version 2.7?
No, it will not work.
First you need to upgrade to 2.4, then it will work on 2.7.
Hi Rajib Kumer Das,
When when run show repository backup2 in CLI ise version 2.7 i am getting this error message
%ERROR: Repository backup2 could not be accessed. In case backup was Restore on different setup, please reconfigure the repository password (expected behavior)
% SSH connect error
This could be an issue with solarwind configuration or compatibility with between solarwind and ise 2.7 ?
You have to make sure that your ISE can reach your Repository and also your credential is correct. There is no issue with compatibility.
Hi, those interface settings, the IP address, etc configured via the CLI initially, are they part of the “configuration backup” ? Or do I need to login to CLI and do a “show run” and backup the configuration ?
Thanks,
Desmond
Hi Desmond,
“Repository” is where you are sending your backup files. If there is any existing repository, you do not need to create one.
i try to make backup but not work
Verify your repository connection by running “show repository“.
Hi Rajib, I want to know how to restore the backup methods.
Hi, you need to go Administration >> System >> Backup & Restore page. In the bottom of the page, you will find Restore option.
Very soon I will write a tutorial on this. Hope, that will help.
Hi Rajib, do you know if ISE is uses passive or active mode for SFTP?
Hi Jacques, if i am not mistaken, there is no passive or active mode of SFTP like FTP.
normally How large are back up files usually ?
It totally depends on the configuration.
If you could be extra nice and include the SFTP software you used,
it would be perfect
thanks
Hi Abdullah, you can use solarwinds sftp server, which is free and easy to use.
URL: https://www.solarwinds.com/free-tools/free-sftp-server