IPSec configuration in Palo alto Networks firewall is easy and simple. In this lesson we will learn, how to configure IPSec VPN on Palo Alto Firewall. So, let’s get started.
IPSec configuration will be done in several steps. These are-
- Tunnel Zone
- Tunnel Interface
- IKE Crypto (phase 1)
- IPSec Crypto (phase 2)
- IKE Gateway
- IPSec Tunnel
- Routes
- Security Policy
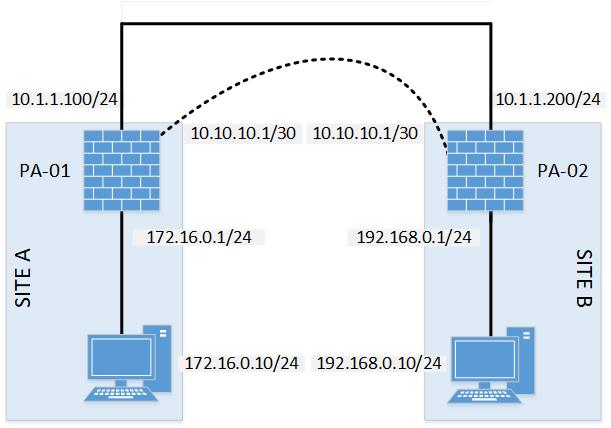
Diagram:
IPSec Configuration:
Before going into details, here is all the necessary parameters for IPSec tunnel. In our case, we will be using two (2) Palo Alto firewall.
VPN Details:
| Description | PA-01 | PA-02 |
| VPN Gateway IP (WAN) | 10.1.1.100 | 10.1.1.200 |
| LAN IP | 172.16.0.0/24 | 192.168.0.0/24 |
| Tunnel Interface IP (St0.0) | 10.10.10.1/30 | 10.10.10.2/30 |
VPN Negotiation Parameters:
| Phase 1 | |
| Authentication Method | Pre-Shared Key |
| Authentication-algorithm | sha-256 |
| Diffie-Hellman Group | Group 5 |
| Encryption Algorithm | AES192 |
| Lifetime (for renegotiation SEC) | 86400 |
| Pre Shared Key | letsconfig |
| Phase 2 | |
| Encapsulation (ESP or AH) | ESP |
| Encryption Algorithm | AES256 |
| Authentication Algorithm | sha1 |
| Lifetime (for renegotiation) | 28800 |
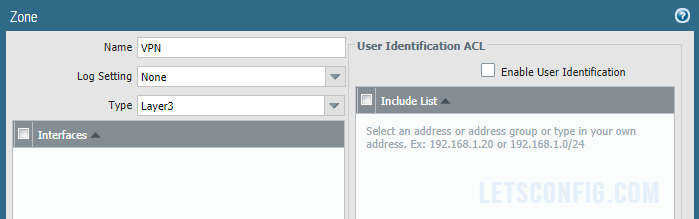
Tunnel Zone
Go to Network >> Zones and click Add. Now add the zone name as VPN and Type of the zone Layer3. And, then click OK.
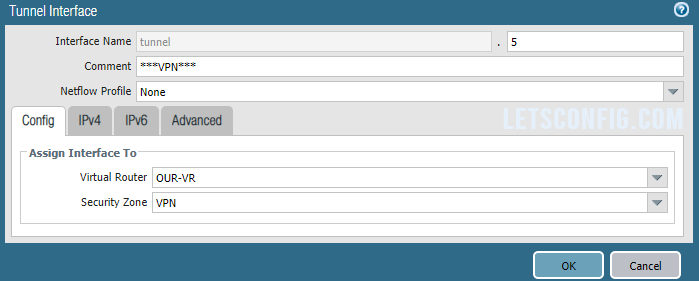
Tunnel Interface
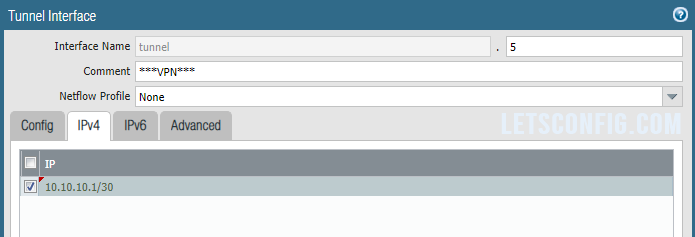
Go to Network >> Interface >> Tunnel and click Add to add a new tunnel. A pop-up will open, add Interface Name, Virtual Router, Security Zone, IPv4 address. In my case, below are the information-
Interface Name: tunnel.5
Virtual Router: Our-VR
Security Zone: VPN
IPv4: 10.10.10.1/30
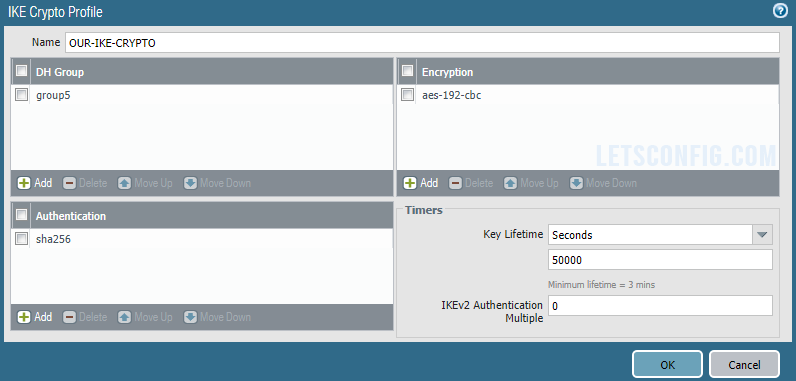
IKE Crypto (phase 1)
Go to Network >> Network Profile >> IKE Crypto and click Add. Now add below details-
Name: OUR-IKE-CRYPTO
DH Group: group5
Authentication: sha256
Encryption: aes-192-cbc
Timers (Key Lifetime): 50,000 seconds
IPSec Crypto (phase 2)
Go to Network >> Network Profile >> IPSec Crypto and click Add. Now add below details-
Name: OUR-IPSEC-CRYPTO
Encryption: aes-256-cbc
Authentication: sha1
DH Group: group2
Lifetime: 10,000 seconds

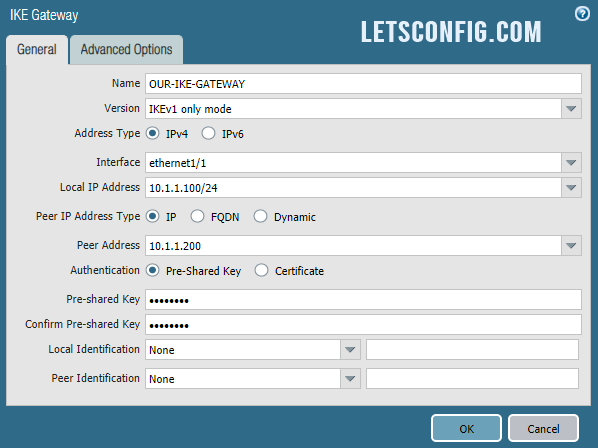
IKE Gateway
Go to Network >> Network Profile >> IKE Gateway and click Add. Now, enter below information-
Name: OUR-IKE-GATEWAY
Version: IKEv1
Interface: ethernet1/1 (IPSec interface)
Local IP Address: 10.1.1.100/24
Peer IP Address Type: IP
Peer Address: 10.1.1.200
Authentication: Pre-Shared Key
Pre-shared Key: LetsConfig
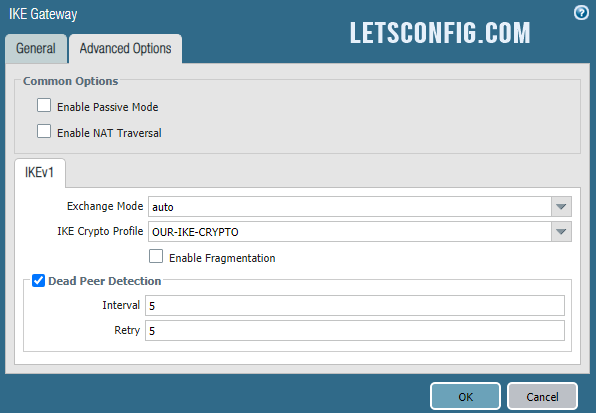
Now go to Advanced Options of the same pop-up window and add IKE Crypto Profile as OUR-IKE-CRYPTO (previously created).
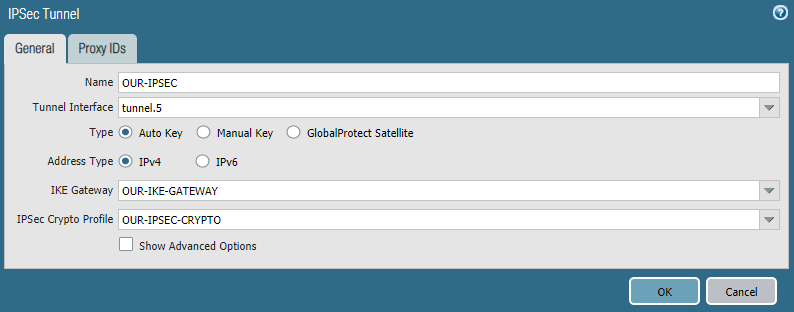
IPSec Tunnel
Go to Network >> IPSec Tunnels and click Add. Now, enter below information-
Name: OUR-IPSEC
Tunnel Interface: tunnel.5
IKE Gateway: OUR-IKE-GATEWAY
IPSec Crypto Profile: OUR-IPSEC-CRYPTO
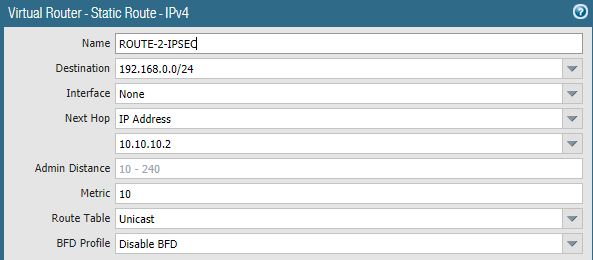
Routes
We need to add routes to reach SITEA to SITEB and vise-versa. Below are the route from SITEA to SITEB, where gateway is IPSec peer IP, which is 10.10.10.2
Security Policy
You need to add two policies. Our from IPSec and other for Site to Site’s communication. Below are the info.
IPSec
Source Zone: Outside
Destination Zone: Outside
Application: ike, ipsec-esp
Site to Site communication
Source Zone: LAN & VPN
Source IP: 172.16.0.0/24 & 192.168.0.0/24
Destination Zone: LAN & VPN
Destination IP: 172.16.0.0/24 & 192.168.0.0/24
Application: any (as per requirement)

Similarly, you need to configure siteB with all the details.
Verification:
Let’s try to ping from siteA to siteB.
PC-1> ping 192.168.0.10

84 bytes from 192.168.0.10 icmp_seq=1 ttl=62 time=8.956 ms
84 bytes from 192.168.0.10 icmp_seq=2 ttl=62 time=10.322 ms
84 bytes from 192.168.0.10 icmp_seq=3 ttl=62 time=9.418 ms
84 bytes from 192.168.0.10 icmp_seq=4 ttl=62 time=11.895 ms
84 bytes from 192.168.0.10 icmp_seq=5 ttl=62 time=11.569 ms
We can successfully reach SiteB from SiteA. Let’s verify IPSec information from palo alto using below command-
admin@PA-VM> show vpn ipsec-sa tunnel OUR-IPSEC

You can clearly see our IPSec tunnel is up and running. So, this is how to configure IPSec VPN on Palo Alto Networks Firewall. Let me know if you have any questions.
Reference guide for troubleshoot.
may i know where are you going to use this VR route
what is the OUR-VR route configuration
This route is for internal communication from our LAN end to another.
Really helpful thank you vaia
Thanks 🙂