Port mirroring feature is used to send a copy of your network’s traffic seen on one interface to another interface. The main purpose of this capture is traffic analysis and debugging to solve network issues.
There are mainly two types of port mirroring-
- Local port mirroring (within same device)
- Remote port mirroring (captured traffic from one device to send, to another device)
Port mirroring configuration of Juniper SRX firewall is different than any other Juniper products. In this lesson, we will learn, how to configure port mirroring in Juniper SRX firewall. This example is mainly for local span.
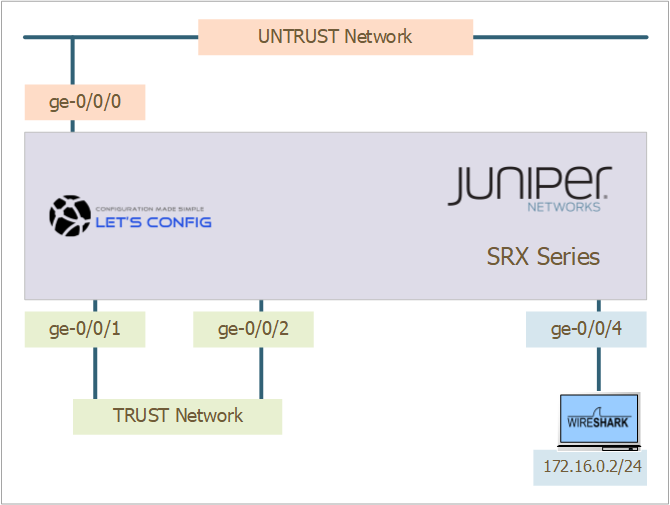
Expectation:
- We need to capture all incoming and outgoing traffic on an internet facing interface.
- In our case, Source Interface: ge-0/0/0; and Destination Interface: ge-0/0/4
I will use below diagram, to demonstrate it.
Configuraiton:
Step 1: Filter Configuraiton:
This is mainly used to define source/destination for the capture. In our case, we want to capture from any source which means 0.0.0.0/0 network and then declare what will do with that traffic.
Configuration:
set firewall filter OUR-PORT-MIRROR term 1 from source-address 0.0.0.0/0
set firewall filter OUR-PORT-MIRROR term 1 then port-mirror
set firewall filter OUR-PORT-MIRROR term 1 then accept
Configuration Verification:
[edit firewall]
Rajib@LetsConfig# show
filter OUR-PORT-MIRROR {
    term 1 {
        from {
            source-address {
                0.0.0.0/0;
            }
        }
        then {
            port-mirror;
            accept;
        }
    }
}
Step 2: Destination Interafce Configuraiton:
Most of the OEM doesn’t require any IP address on Analyzer end. However, in Juniper SRX, you need to add an IP address to get captured traffic. That means, we also need to add IP address on your Analyzer connected interface (ge-0/0/4).
Configuration:
set interfaces ge-0/0/4 description ***Mirror-Interface***
set interfaces ge-0/0/4 unit 0 family inet address 172.16.0.1/24
Configuration Verification:
[edit interfaces ge-0/0/4]
Rajib@LetsConfig# show
description ***Mirror-Interface***;
unit 0 {
    family inet {
        address 172.16.0.1/24;
    }
}
Step 3: Port Mirror Configuraiton:
In this section, we will define where we will send captured traffic and its rate and run-length details. 1 means, we are sending every packet in monitoring interface. Here, 172.16.0.10 is our analyzer IP address.
Configuration:
set forwarding-options port-mirroring input rate 1
set forwarding-options port-mirroring input run-length 1
set forwarding-options port-mirroring family inet output interface ge-0/0/4.0 next-hop 172.16.0.10
Configuration Verification:
[edit forwarding-options]
Rajib@LetsConfig# show
port-mirroring {
    input {
        rate 1;
        run-length 1;
    }
    family inet {
        output {
            interface ge-0/0/2.0 {
                next-hop 172.16.0.10;
            }
        }
    }
}
Step 4: Source Interafce Configuraiton:
Now, it’s time to declare our interface, where we want to add our filter. In our case, it will be ge-0/0/0 for both incoming and outgoing directions.
Configuration:
set interfaces ge-0/0/0 description ***Outside-Interface***
set interfaces ge-0/0/0 unit 0 family inet filter input OUR-PORT-MIRROR
set interfaces ge-0/0/0 unit 0 family inet filter output OUR-PORT-MIRROR
Configuration Verification:
[edit interfaces ge-0/0/0]
Rajib@LetsConfig# show
description ***Outside-Interface***;
unit 0 {
    family inet {
        filter {
            input OUR-PORT-MIRROR;
            output OUR-PORT-MIRROR;
        }
        address 192.168.3.123/24;
    }
}
If you follow my instructions properly, you will be starting seeing traffic in your analyzer. Let me know, if you have any questions regarding this. Best of luck.