Most of the engineers use GUI to configure Palo Alto Next-Generation Firewall. Only few are comfortable with CLI. Being different, we choose Palo Alto Firewall Configuration through CLI as our topic. Hope after completing this, you will be comfortable with CLI. So, let’s be get started.
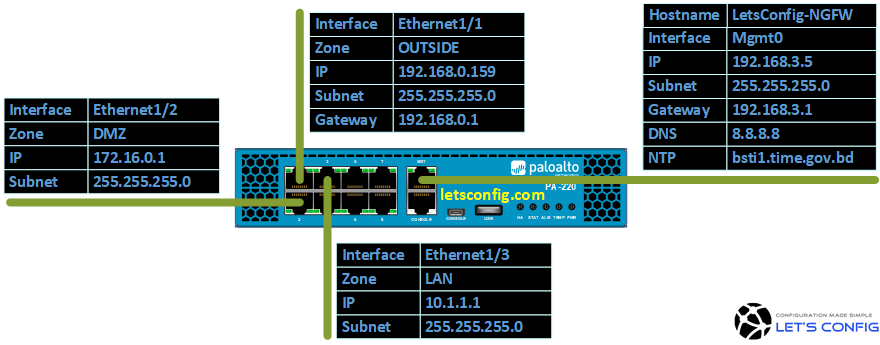
Our Network Topology:
Configuration:
First of all, we will start with hostname configuration-
Changing Hostname
admin@PA-VM# set deviceconfig system hostname LetsConfig-NGFW
After that, we will run commit command.
admin@PA-VM# commit

Commit job 3 is in progress. Use Ctrl+C to return to command prompt
............55%.75%98%...........100%
Configuration committed successfully

[edit]
admin@LetsConfig-NGFW#
Adding Static Management IP
By default, Palo Alto use DHCP IP. So, we need to delete DHCP and choose Static IP.
Changing DHCP to Static:
admin@LetsConfig-NGFW# delete deviceconfig system type dhcp-client
admin@LetsConfig-NGFW# set deviceconfig system type static

Adding MGMT IP:
admin@LetsConfig-NGFW# set deviceconfig system ip-address 192.168.3.5
admin@LetsConfig-NGFW# set deviceconfig system netmask 255.255.255.0
admin@LetsConfig-NGFW# set deviceconfig system default-gateway 192.168.3.1

MGMT Access Control:
admin@LetsConfig-NGFW# set deviceconfig system permitted-ip 192.168.3.0/24
Other Management Configuration
Adding Time zone:
admin@LetsConfig-NGFW# set deviceconfig system timezone Asia/Dhaka
Adding DNS IP:
We will add 8.8.8.8 as our primary DNS and 8.8.4.4 as our secondary DNS.
admin@LetsConfig-NGFW# set deviceconfig system dns-setting servers primary 8.8.8.8
admin@LetsConfig-NGFW# set deviceconfig system dns-setting servers secondary 8.8.4.4
Adding NTP:
We will use FQDN. SO, DNS is must for this.
admin@LetsConfig-NGFW# set deviceconfig system ntp-servers primary-ntp-server ntp-server-address bsti1.time.gov.bd
admin@LetsConfig-NGFW# set deviceconfig system ntp-servers secondary-ntp-server ntp-server-address bsti2.time.gov.bd
Service Route:
Now, let’s talk about service routes. The default behavior is, Palo Alto will send all management services request to management interface. For example, licenses retrieval will be through management interface as per default settings. If there is no internet connectivity in your mgmt interface, you will not be able to retrieve licenses from Palo Alto Networks support portal (how to activate licenses in Palo Alto Firewall). So, let’s change route for PaloAlto Network Services from management interface to OUTSIDE interface.
admin@LetsConfig-NGFW# set deviceconfig system route service paloalto-networks-services source interface ethernet1/1
admin@LetsConfig-NGFW# set deviceconfig system route service paloalto-networks-services source address 192.168.0.159/24
Zone Configuration:
We will configure total three (3) Zones. These are – UNTRUST, DMZ, and LAN.
admin@LetsConfig-NGFW# set zone UNTRUST network layer3 ethernet1/1
admin@LetsConfig-NGFW# set zone DMZ network layer3 ethernet1/2
admin@LetsConfig-NGFW# set zone LAN network layer3 ethernet1/3
Virtual Router Configuration with default Static route:
We will create only one Virtual router. Our default route will be towards our EDGE router.
Adding interfaces in virtual router:
admin@LetsConfig-NGFW# set network virtual-router OUR-VR interface [ ethernet1/1 ethernet1/2 ethernet1/3 ]

Adding default static route:
admin@LetsConfig-NGFW# set network virtual-router OUR-VR routing-table ip static-route OUR-DEFAULT-ROUTE destination 0.0.0.0/0
admin@LetsConfig-NGFW# set network virtual-router OUR-VR routing-table ip static-route OUR-DEFAULT-ROUTE nexthop ip-address 192.168.0.1
admin@LetsConfig-NGFW# set network virtual-router OUR-VR routing-table ip static-route OUR-DEFAULT-ROUTE interface ethernet1/1
Interfaces Configuration:
Here we will add interface type, IP addresses, and description.
UNTRUST Interface:
admin@LetsConfig-NGFW# set network interface ethernet ethernet1/1 layer3 ip 192.168.0.159/24
admin@LetsConfig-NGFW# set network interface ethernet ethernet1/1 comment ***CONNECTED-TO-OUTSIDE***

DMZ Interface:
admin@LetsConfig-NGFW# set network interface ethernet ethernet1/2 layer3 ip 172.16.0.1/24
admin@LetsConfig-NGFW# set network interface ethernet ethernet1/2 comment ***CONNECTED-TO-DMZ***

LAN Interface:
admin@LetsConfig-NGFW# set network interface ethernet ethernet1/3 layer3 ip 10.1.1.1/24
admin@LetsConfig-NGFW# set network interface ethernet ethernet1/3 comment ***CONNECTED-TO-LAN***
Security Policies Configuration:
Now, we will configure internet access for LAN zone. You are welcome to add remaining policies on your own. And, do let me know if you have any confusion.
admin@LetsConfig-NGFW# set rulebase security rules LAN-2-OUTSIDE to UNTRUST
admin@LetsConfig-NGFW# set rulebase security rules LAN-2-OUTSIDE from LAN
admin@LetsConfig-NGFW# set rulebase security rules LAN-2-OUTSIDE source 10.1.1.0/24
admin@LetsConfig-NGFW# set rulebase security rules LAN-2-OUTSIDE destination any
admin@LetsConfig-NGFW# set rulebase security rules LAN-2-OUTSIDE application [ web-browsing ssl ping dns ]
admin@LetsConfig-NGFW# set rulebase security rules LAN-2-OUTSIDE action allow
admin@LetsConfig-NGFW# set rulebase security rules LAN-2-OUTSIDE log-end yes
NAT PolicyProfile:
In our case, we will configure PAT for our LAN traffic towards Internet. Rest NAT(s) are you task. Try it and let me know if you face any issue.
admin@LetsConfig-NGFW# set rulebase nat rules OUR-NAT from LAN
admin@LetsConfig-NGFW# set rulebase nat rules OUR-NAT to UNTRUST
admin@LetsConfig-NGFW# set rulebase nat rules OUR-NAT source 10.1.1.0/24
admin@LetsConfig-NGFW# set rulebase nat rules OUR-NAT destination any
admin@LetsConfig-NGFW# set rulebase nat rules OUR-NAT to-interface ethernet1/1
admin@LetsConfig-NGFW# set rulebase nat rules OUR-NAT service any
admin@LetsConfig-NGFW# set rulebase nat rules OUR-NAT source-translation dynamic-ip-and-port interface-address interface ethernet1/1 ip 192.168.0.159/24
Management Profile:
By default, PING is denied in interface IPs. But, sometimes we might need ping in our interfaces for troubleshoot purposes. So, let’s create a management profile and allow PING only on our LAN interface.
admin@LetsConfig-NGFW# set network profiles interface-management-profile OUR-MGMT-PROFILE ping yes
admin@LetsConfig-NGFW# set network interface ethernet ethernet1/1 layer3 interface-management-profile OUR-MGMT-PROFILE
Commit your PA CLI configuration:
And, finally, run commit command to make candidate configuration as running configuration.
admin@LetsConfig-NGFW# commit

Commit job 5 is in progress. Use Ctrl+C to return to command prompt
............55%.75%98%...........100%
Configuration committed successfully

[edit]
admin@LetsConfig-NGFW#
It’s easy, isn’t it? Try yourself, be comfortable. Let me know, what you think about Palo Alto Firewall Configuration through CLI?