Antivirus, Anti-Spyware, and Vulnerability Protection is a part of Threat Prevention on Palo Alto Networks. Today in this lesson, we will learn to set up Antivirus, Anti-Spyware, and Vulnerability Protection for Palo Alto Firewalls. So, let’s start.
License
First of all, you need to purchase Threat Prevention license. This will cover all of these three (3) categories. To check current status of your license, you need to go Device >> Licenses and check Threat Prevention section of the license.

If you want to add a new license on Palo Alto Network firewall, you should check – Activating Licenses and Subscriptions in Palo Alto Firewalls.
Dynamic Updates
It is recommended to have latest and greatest version of Antivirus, Applications and Threats installed while configuring Threat Prevention. You should check, if there is any new version available. If available, just download an install them.
To check availability of a new version, you should go to Device >> Dynamic Updates and click on Check Now.
Security Profiles
Now, time to create security profiles. Each and every company has their own sets of requirement to create these profiles. So, check your company’s requirement first.
However, it is recommended to clone existing (default) profile for each category and modify them as per company requirements. Palo Alto default profiles were based on best practices. So, most of the companies will be OK with default.
Antivirus Profile
Firstly, go to Objects >> Security Profiles >> Antivirus, select default profile and click Clone. A pop-up window will be shown, click OK to continue.

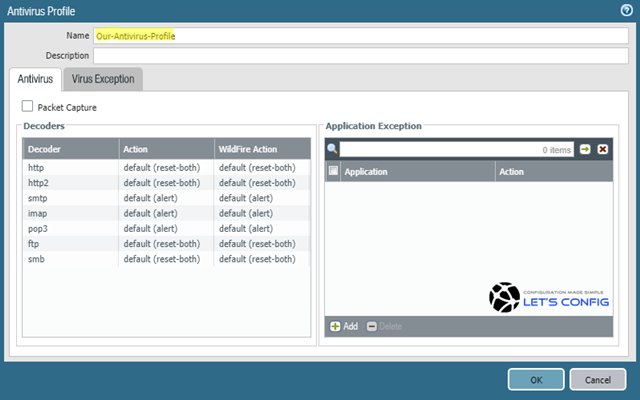
Name of the new profile will be default-1. Click on that and change the name. In my case, i named it Our-AV-Profile.
Anti-Spyware
Similarly, you need to create Anti-Spyware profile. To do that, go to Objects >> Security Profiles >> Anti-Spyware, select default profile and click Clone. A pop-up window will be shown, click OK to continue.
New Anti-Spyware profile will be there with default-1 name. Click on that and change the name. In my case, i named it Our-AS-Profile.
Vulnerability Protection
Likewise, you can create Vulnerability Protection profiles. In my case, i cloned default profile and name it as Our-VP-Profile.
Security Policies
You need to attach your security profiles in security policies. To do this, go to Policies >> Security and click on your outbound policy. In my lab, it is Access-to-Internet.
Now, open your policy and go to Action tab. Select Profile Setting as Profiles from drop down menu. Now, attach your Antivirus, Anti-Spyware, and Vulnerability Protection profile just likes below-
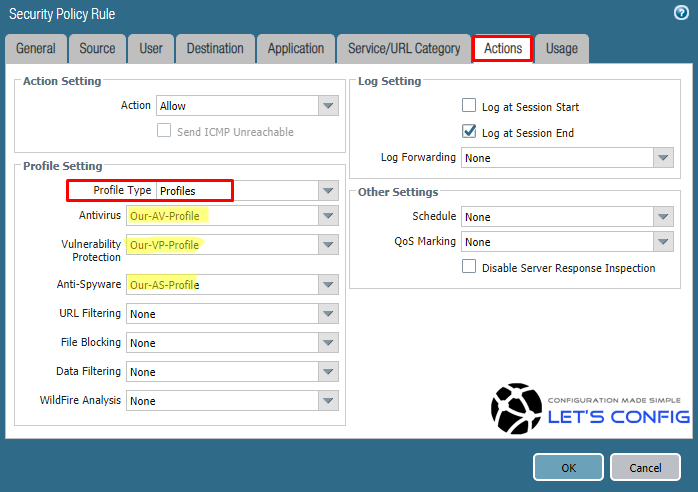
Finally, commit your changes. Above all, Palo alto official Threat Prevention guide recommends for you.