Zone based firewall configuration concept in Palo Alto is similar to any other firewall. In this lesson, we will learn to configure Palo Alto Zone Based Firewall. We will be using PAN OS 8.1.0, and our firewall management is already configured. If you are new in Paloalto firewall, then you are recommended to check Palo Alto Networks Firewall Management Configuration.
LAB Goals:
- 3 zones for External, Internal and DMZ network and bind with appropriate interfaces
- Internal zone (LAN users) can reach Internet
- DMZ WEB server access from Internal Zone
- External people will be able to access WEB server only through NAT
LAB Diagram:
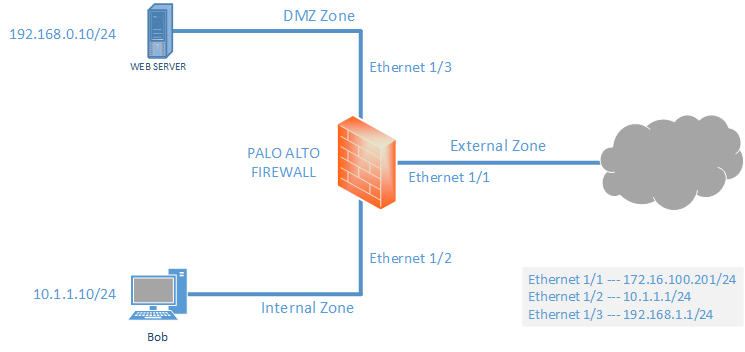
After completing this LAB, we will develop some knowledge to configure Zone, Virtual Routers, Interface Configuration, Policies, NAT and Routing (Static).
In policy section, we will allow every application and services (any) to make article short and easier for new comers. Later we will discuss in detail. So, let’s get started with Palo Alto Zone Based Firewall Configuration.
Configuration:
Zone creating and binding to appropriate interfaces
Creating Zone:
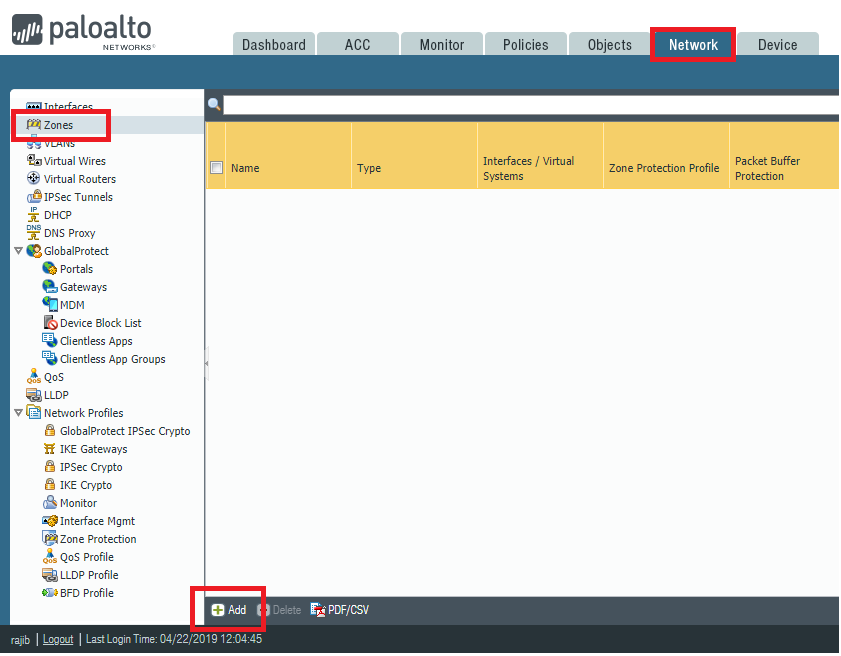
To create the zone, we need to go to Network >> Zones and then click Add.
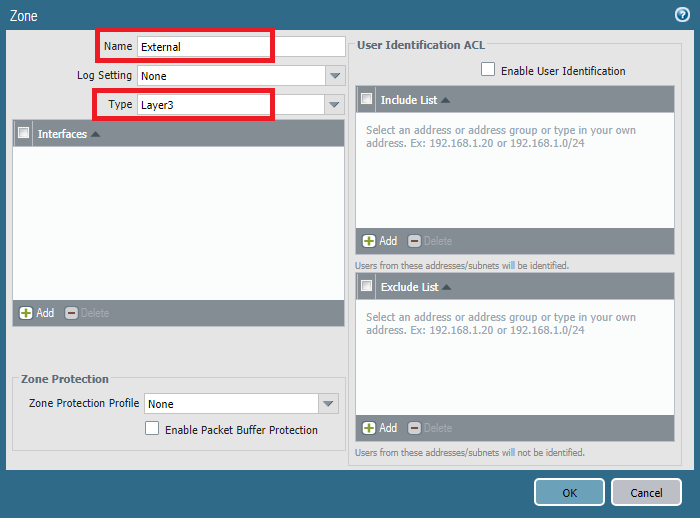
Now, name the Zone and select zone type. Below image shows External zone, creating with L3 type. Similarly, we also created other two zones named Internal and DMZ with L3 zone type.
Creating Virtual Routers:
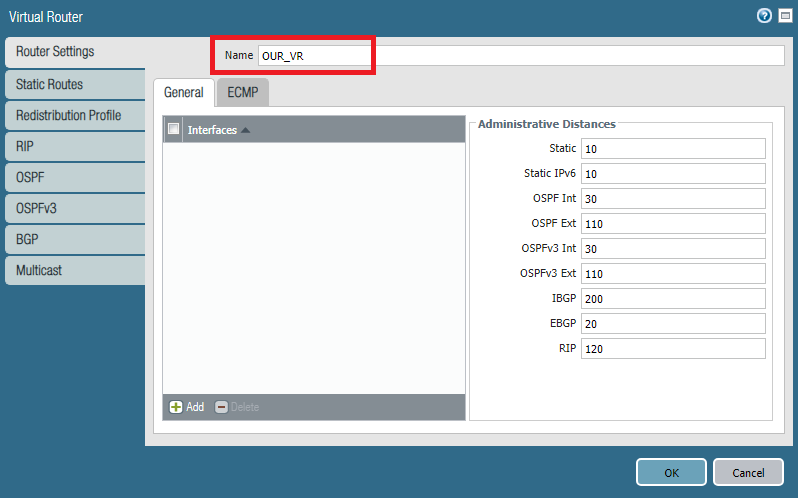
To create virtual routers, we have to go Network >> Virtual Routers and then click Add.
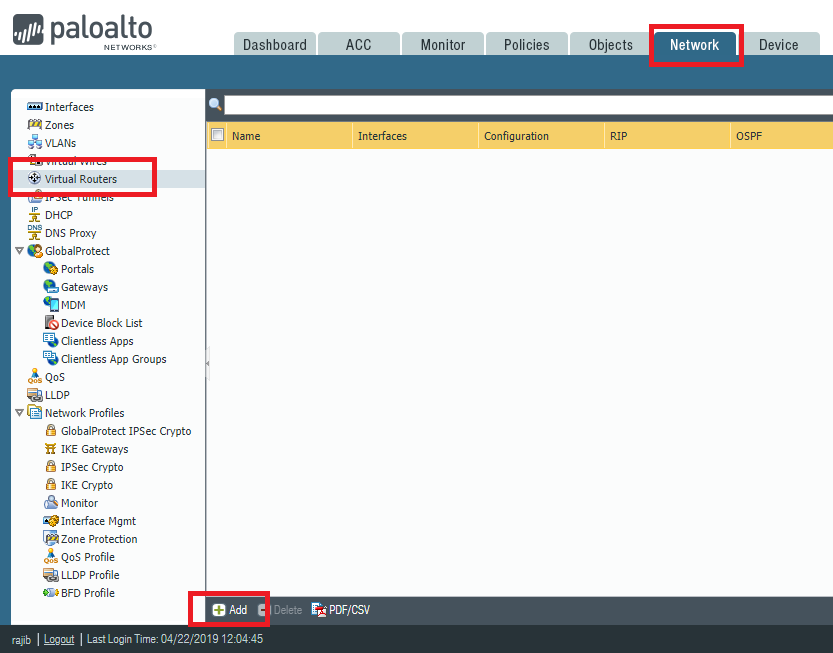
You will find lots of options here, including all the routing configuration. Just name the Virtual Router, rest will be configured later. In our example, we are creating Virtual Routers name OUR_VR.
Interface Configuration:
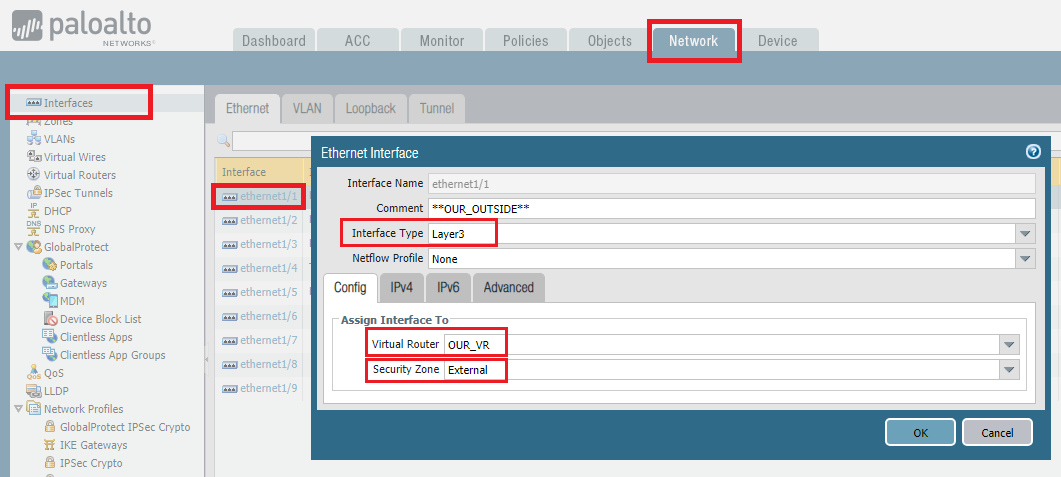
For interface configuration, first of all we need to go Network >> Interfaces and then click on the interfaces.
In our example, Ethernet 1/1 is our outside interface. So, after clicking Ethernet 1/1, we are giving comment (description), Interface type as Layer3. Then, we will assign the virtual router OUR_VR and zone External.
On the same page, we have to add IP address. We are using IPv4, so we are clicking on IPv4 and adding the IP address for external interface by clicking Add.
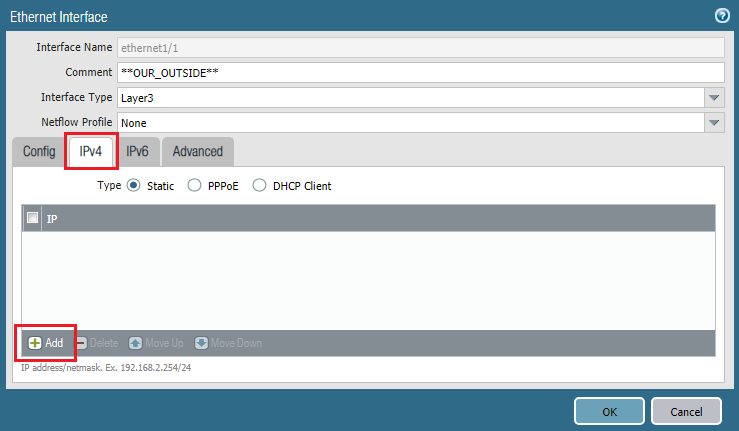
Similarly, we need to do the same steps for Internal and DMZ zone to add IP addresses for them. In our LAB 10.1.1.1/24 is Internal interface IP and 192.168.1.1/24 is DMZ interface IP.
Finally, commit all the configuration by clicking Commit from right top corner.
Reaching Internet from Internal Zone
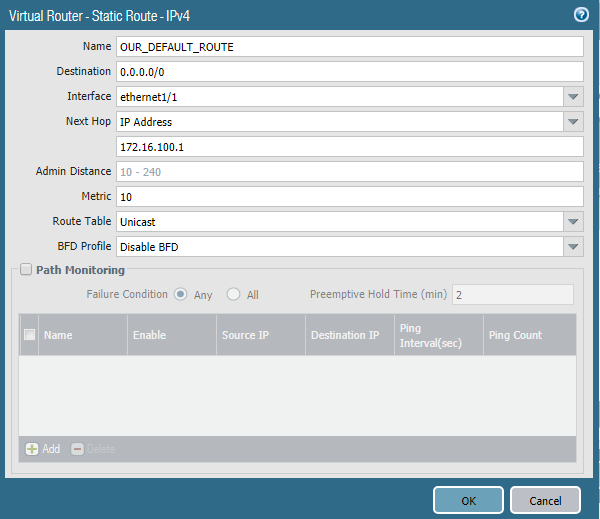
First of all, we need to add routing configuration. To do so, we need to go to Network >> Virtual Routers and then click newly created virtual router named OUR_VR.
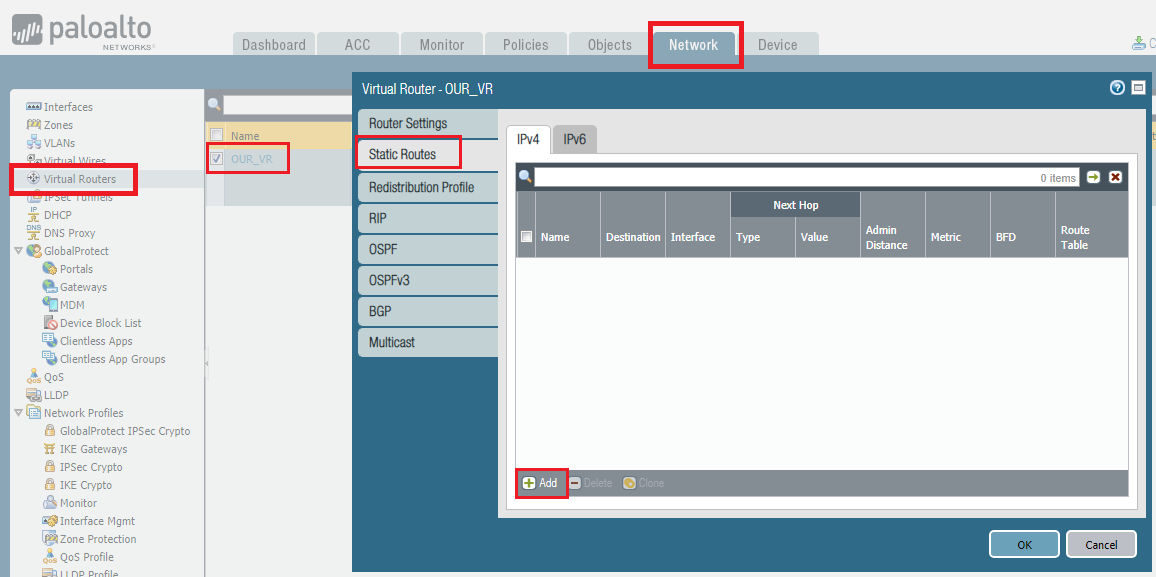
Below are the configuration of our LAB setup.
Now, we need to configure the policy for Inside to Outside communication. By default, interzone communication is blocked.
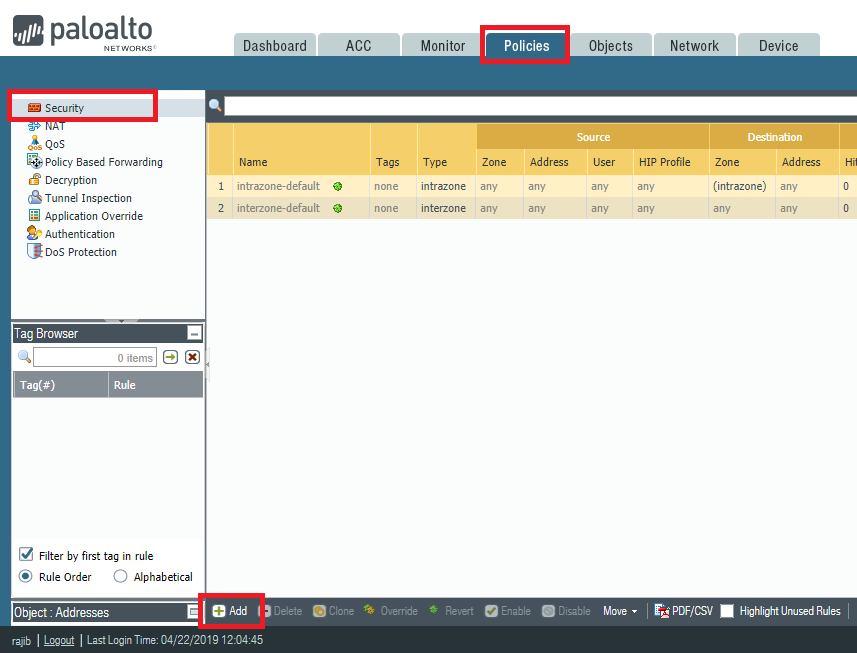
In policy, we need to configure minimum 4 section. We are configuring according below listed information.
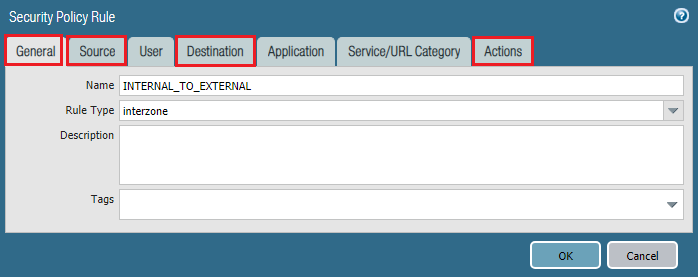
General:
Name: INTERNAL_TO_EXTERNAL
Rule Type: interzone

Source:
Source Zone: Internal
Source Address: 10.1.1.0/24

Destination:
Destination Zone: External
Source Address: any

Action:
Action: Allow
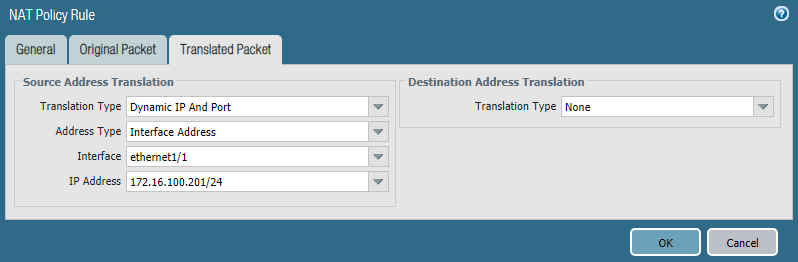
Now, we need to create NAT rule. To create go to Policies >> NAT and click Add to add the NAT rule.
We use below information to create the NAT rule.
General
Name: INTERNAL_TO_INTERNET

Original Packet
Source Zone: Internal
Destination Zone: External
Destination Interface: ethernet 1/1
Source Address: 10.1.1.0
Destination Address: Any

Translated Packet
(Source Address Translation)
Translation Type: Dynamic IP And Port
Address Type: Interface Address
Interface: ethernet 1/1
IP Address: 172.16.100.201/24
Now, we need to commit all the configuration by clicking Commit.
Verification:
Let’s have a http request to www.paloaltonetworks.com from Internal network.
C:\>ipconfig

Windows IP Configuration

Ethernet adapter Local Area Connection:

   Connection-specific DNS Suffix  . :
   Link-local IPv6 Address . . . . . : fe80::6cf7:1072:c575:5
   IPv4 Address. . . . . . . . . . . : 10.1.1.10
   Subnet Mask . . . . . . . . . . . : 255.255.255.0
   Default Gateway . . . . . . . . . : 10.1.1.1
Sure enough, our Internal LAN users BOB can access the internet.
WEB Server configuration on DMZ
DMZ server is connected to ethernet 1/3 interface which belong to DMZ zone. Our WEB server IP is 192.168.1.10. Now, let’s create policies for communication between INTERNAL and DMZ zone.
INTERNAL to DMZ:
General:
Name: INTERNAL_TO_DMZ
Rule Type: interzone

Source:
Source Zone: Internal
Source Address: 10.1.1.0/24

Destination:
Destination Zone: External
Source Address: 192.168.1.0/24

Action:
Action: Allow
DMZ to INTERNAL
General:
Name: DMZ_TO_INTERNAL
Rule Type: interzone

Source:
Source Zone: DMZ
Source Address: 192.168.1.0/24

Destination:
Destination Zone: Internal
Destination Address: 10.1.1.0/24

Action:
Action: Allow
We can verify the result by hitting WEB server IP https://192.168.1.10 from Internal LAN PC (10.1.1.10).

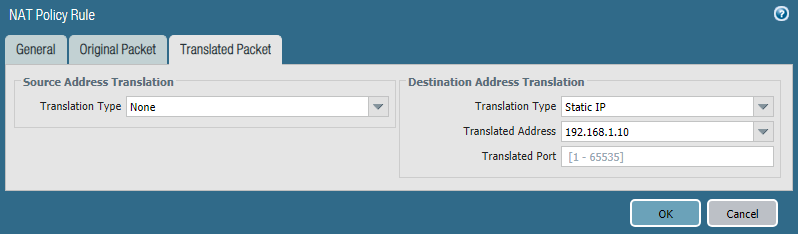
Now, time for External users. We will configure Destination NAT for outside users. To create destination NAT, we have to go Policies >> NAT and then click Add to add the NAT rule.
Below are our NAT configuration.
General
Name: DESTINATION_NAT

Original Packet
Source Zone: External
Destination Zone: External (it's because we will hit external IP)
Destination Interface: ethernet 1/1
Source Address: any
Destination Address: 172.16.100.199 (this is our Outside IP :P )

Translated Packet
(Destination Address Translation)
Translation Type: Static IP
Translated Address: 192.168.1.10
Verification:
To verify, let’s do a http request to http://172.16.100.199 which is our WEB server external IP.
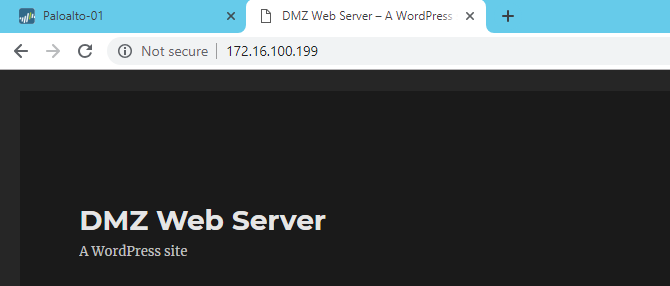
Result looks perfect. Finally, we can reach WEB server from External Zone.
Hi Rajib
Thank you for making this write-up. It is very well done
But on INTERNAL to DMZ policy, the destination OR source zone is DMZ not External..
Hi Toufik, thanks for correcting me. It’s updated now.
Thank you for making this write-up. It is very well done.
One thing that would be very helpful for me would be to define exactly what the external IP space is comprised of. Reading though this, I am guessing that the palo is located behind your home router, since the wan side is in the private IP range?
The screenshot of the vrouter is showing a next hop of 172.16.100.1 and your External zone interface is assigned .199, but your nat rules refer to .201. I am guessing the .1 is your home network’s default gateway, and .199 is Eth1, but im stumped on what .201?
Hi calv, here is the details of IP addresses-
External interface IP is 172.16.100.201
NAT IP (external) for Webserver is 172.16.100.199
Gateway is 172.16.100.1
dose Dmz has to be be on a physical interface? or you can use Vlan as DMZ.?
Without physical interface, how you will pass vlan?
hi rajib, it helps me alot, thanks 🙂
hey, you are most welcome 🙂
Hi Rajib, I am replacing some Junipers with the Palo Altos. Thanks for the article. However, I still cannot get to the internet. Does this configuration require the virtual wire from ethernet 1/1 to ethernet 1/2? I have deleted it because I plan on setting up VPNs between our clinics and the Data Center.
Thanks again,
John
There is no relation between virtual wire and internet. You just need to have uplink, policies and nat configured properly.
Hi Rajib,
I am using VM series PA FW and version is 9.
I am unable to reach Internet from Trust to untrust zone in EVE lab environment, traffic logs also not generating. Please
From FW i am able to reach Internet and i guess this is from Management interface.
Created NAT and allowed policy as well but no luck
Please help me to reach internet from trust to untrust network
Hi Imran,
You need licenses to see logs. Without license there will be no logs.
And for internet, did you configured your routing properly?
Thanks for sharing this. Easy to understand..
You’re welcome.
hi rajib, my zone protection profile is not blocking anything can you tell me why is it behaving like this?
Hi afreen, what you want to block? Share us details.
Hi
I am unable to find my web server public IP address.
I can see your web server IP is 172.16.100.199
Could you please tell me how to set it on palo alto ?
Thank you very much!
IP address 172.16.100.199 is situated outside of my LAB network. That’s why it was used as my outside facing IP address in NAT. In a real environment, you should use a Public IP address.
I have a PA-220 with 8 ports available + 1MGMT. I don’t have a switch to uplink to the firewall and was wondering if possible to use and segment those 8 ports for internal, dmz and mgmt subnets?
Hi rmnv,
Yes, you can segregate your interfaces as per your requirements.
Hi,
I am unabe to find IP address for translated packet in source address translation.
its showing “None” and ip address of ethernet 1/1 is not displaying in the drop down box.
General
Name: INTERNAL_TO_INTERNET
Original Packet
Source Zone: Internal
Destination Zone: External
Destination Interface: ethernet 1/1
Source Address: 10.1.1.0
Destination Address: Any
Translated Packet
(Source Address Translation)
Translation Type: Dynamic IP And Port
Address Type: Interface Address
Interface: ethernet 1/1
IP Address: None
Hi Sanjith, it should be there. I think, you need to double check your interface configuration and also the NAT settings.
Hello Rajib,
Very helpful post for a PAN neophyte like me.
Thanks for sharing.
Kind regards,
Junix
Hi Junix, I am glad to know that it helps.